
TL;DR:
- Hand-carved stamps are unique, crafted manually, and carry a personal, artisanal aesthetic.
- They are cost-effective, durable, and ideal for branding, crafts, and personal projects.
- Proper design, tools, and techniques are essential to create functional and visually appealing stamps.
Most people assume all stamps look the same. Roll one in ink, press it down, and you get a neat, clinical impression that could have come from any factory. That assumption is simply wrong. Hand-carved stamps sit in a completely different category, one shaped by the maker’s own hands, tools, and design choices. Whether you want to brand your small business packaging with something genuinely distinctive, add a personal flourish to handmade cards, or explore a satisfying craft, hand-carved stamps deliver something no machine can replicate.
Table of Contents
- What is a hand-carved stamp?
- Essential tools and materials for hand-carved stamps
- How hand-carved stamps differ from machine-made alternatives
- Design tips and common pitfalls for hand-carved stamps
- Hand-carved stamps in action: uses for branding, crafts, and more
- Our perspective: the value you cannot replicate with a click
- Explore custom stamp options for your own projects
- Frequently asked questions
Key Takeaways
| Point | Details |
|---|---|
| Personalised impressions | Hand-carved stamps deliver unique, authentic designs for branding, crafts, or personal use. |
| Essential toolkit matters | Choosing the right materials and sharp tools ensures quality and safety in stamp-making. |
| Handmade stands out | Hand-carved stamps offer distinctiveness and emotional value unmatched by machine-made options. |
| Simple designs work best | Bold lines and thoughtful planning prevent breaks and yield the most durable, attractive results. |
What is a hand-carved stamp?
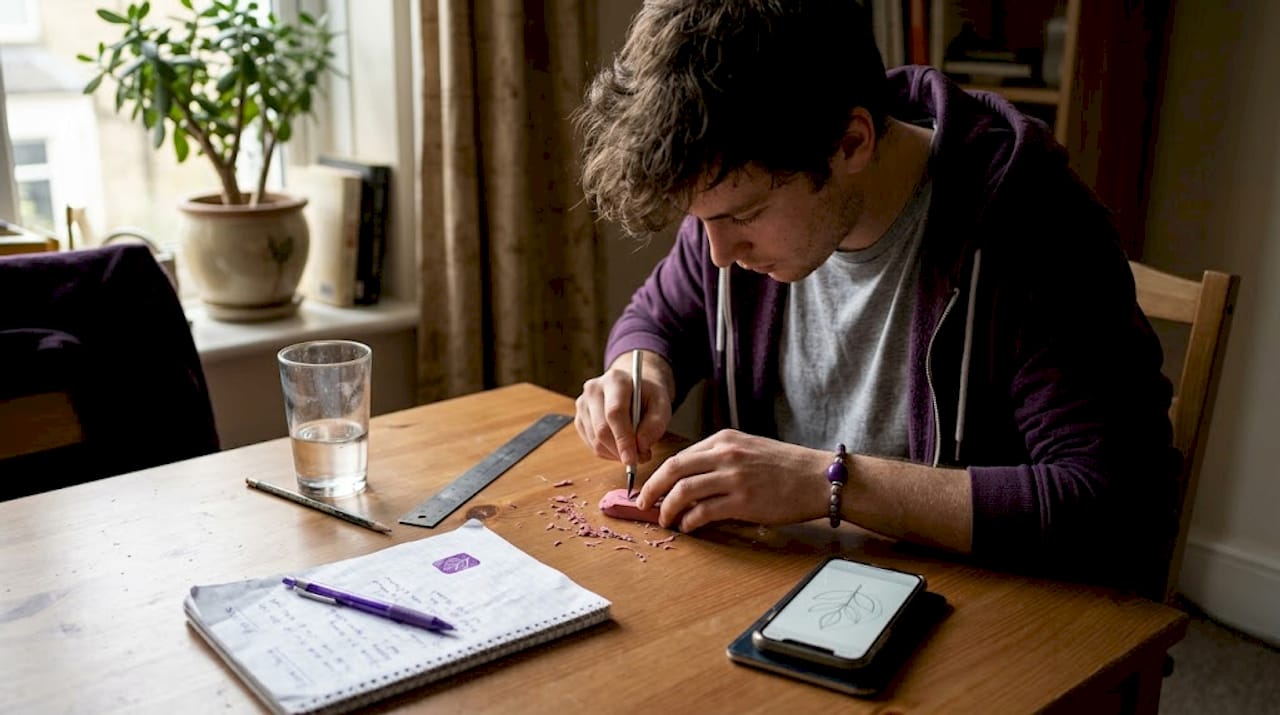
A hand-carved stamp is not just a stamp with a prettier design. According to a widely cited tutorial, a hand-carved stamp is a custom stamp created by manually carving a design into a block of soft material such as rubber, eraser, linoleum, or wood using specialised tools, allowing individuals to produce unique stamps for personal, craft, or branding purposes. That definition covers a broad spectrum of skill levels, from a child pressing a simple star shape into an eraser to a professional artist carving an intricate logo into a dense rubber block.
The materials used vary widely, each with distinct qualities:
- Rubber carving blocks: Soft, flexible, and forgiving for beginners
- White erasers (e.g., Paper Mate Pink Pearl): Inexpensive and easy to source, good for quick projects
- Linoleum: Firmer, produces crisp lines, popular for detailed or professional work
- Wood: Durable, gives a rustic character, suited to repetitive industrial printing
Tools are equally important. Carving knives, lino-cutting sets, pencils for tracing designs, and quality ink pads all contribute to the finished result. The process is entirely manual, which is precisely what makes each stamp distinctive. Even two people carving the same design will produce slightly different results.
“The hand-carved stamp carries the mark of the person who made it. That trace of human involvement is something analogue and irreplaceable in an age of digital reproduction.”
For businesses, this analogue quality is a practical asset. Custom logo stamps created with hand-carving techniques signal craftsmanship and care, qualities that resonate with customers who value authenticity. The moment someone receives a parcel stamped with a clearly hand-crafted mark, they notice it.
Essential tools and materials for hand-carved stamps
Understanding the tools available makes the difference between a frustrating first attempt and a satisfying result. Whether you plan to carve your own stamps or commission a specialist, knowing the materials helps you communicate exactly what you want.
| Material | Characteristics | Best uses |
|---|---|---|
| Soft rubber block (e.g., Speedy-Carve) | Soft, easy to cut, holds fine detail | Beginners, logos, mixed designs |
| White eraser | Very inexpensive, widely available | Simple shapes, quick tests |
| Linoleum | Firmer, slightly resistant, crisp prints | Detailed designs, professional use |
| Wood | Hard, durable, rustic texture | Decorative, repetitive commercial runs |
Common materials include soft pink rubber carving blocks, white erasers such as Paper Mate Pink Pearl, and linoleum for firmer prints, while tools include lino-cutting sets from brands like Speedball and Essdee, StaZon ink pads, and brayers for block printing ink. That equipment list may look long, but you rarely need everything at once.
Here are the essential tools to gather before starting:
- Carving knife or craft knife: For cutting straight lines and outlining shapes
- Lino-cutting set: Includes interchangeable blades in V-shape and U-shape profiles
- Pencil and transfer paper: For tracing your design onto the block
- Ink pad: StaZon is widely recommended for its crisp, quick-drying results
- Brayer: A small roller for applying block printing ink evenly
- Scrap paper: Essential for test prints throughout the carving process
Pro Tip: Always use the sharpest blade possible. A dull tool requires more pressure, which means less control and a greater chance of slipping or tearing the material. Sharp tools are safer, not just more effective.
For project-specific recommendations: beginners should start with a soft rubber block or eraser for simple shapes, saving linoleum for once you are comfortable with the tools. For personalised stamp uses, the material choice matters, as a stamp destined for hundreds of weekly uses on packaging benefits from the durability of a linoleum or dense rubber block rather than a standard eraser.
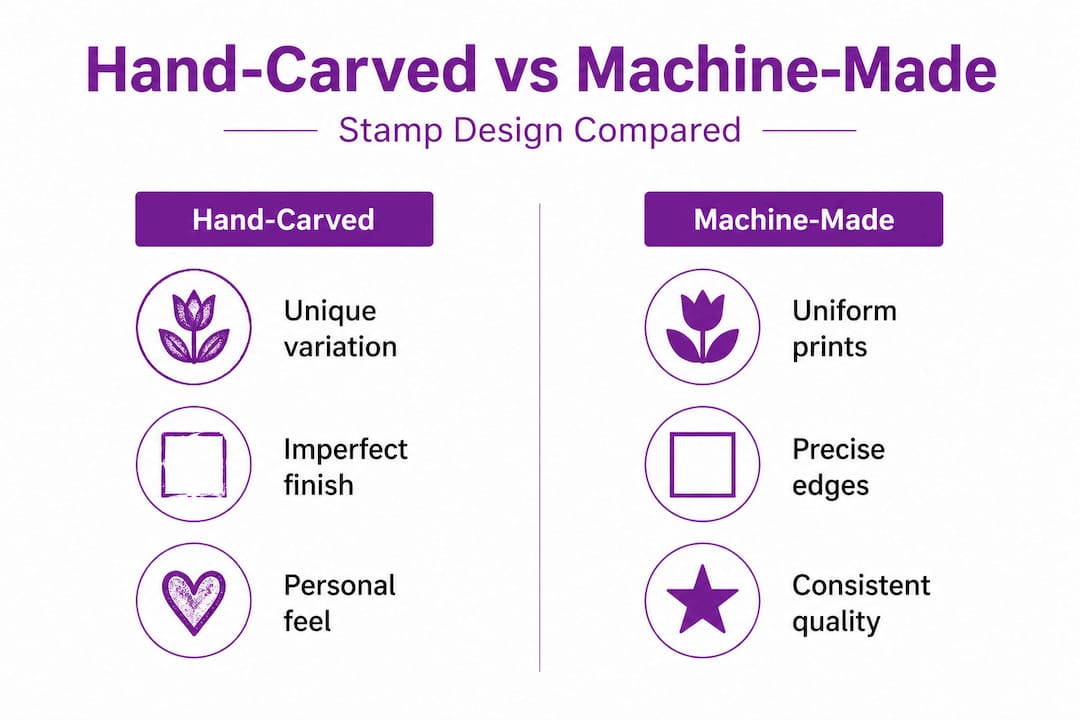
How hand-carved stamps differ from machine-made alternatives
The distinction between hand-carved and machine-made stamps is not simply about cost or convenience. It reflects a genuine difference in aesthetic outcome, production method, and the kind of impression, both literal and figurative, the stamp leaves.
| Feature | Hand-carved | Machine-made |
|---|---|---|
| Appearance | Unique, slight variation per print | Perfectly uniform every time |
| Cost | Low for one-offs (materials approx. £5-10) | Higher setup cost for custom designs |
| Production speed | Slower, measured in hours | Fast, minutes for digital files |
| Durability | Thousands of impressions from one block | Varies by material and method |
| Branding impact | Artisanal, personal, distinctive | Professional, polished, corporate |
Hand-carved stamps offer a unique, imperfect handmade aesthetic compared to machine-made uniformity, making them ideal for small businesses branding packaging and tags due to their customisability, with a lower cost for one-offs at approximately £5 to £10 for initial materials, and durability for thousands of uses.
The pros of each method are worth laying out clearly:
Hand-carved advantages:
- Every impression carries subtle, genuine variation that signals craftsmanship
- Low upfront cost for small runs and unique designs
- No digital file or professional design software required
- The imperfection is the point, buyers of handmade goods value visible human involvement
Machine-made advantages:
- Precision and consistency across large print runs
- Faster production for bulk orders
- Easier integration with digital logo files
- Lower per-unit cost at scale
Handmade stamps are prized for their artisanal quirks and imperfections that boost authenticity, while machine-made alternatives are faster for production but lack that sense of uniqueness. For a sole trader who wraps each order by hand or a crafter who sells at markets, that authenticity is not a flaw but a feature.
The impact on UK SME branding is particularly clear when you consider how small businesses differentiate themselves. A hand-carved stamp on packaging communicates immediately that a real person made and packed that item. That matters to customers who consciously choose independent sellers over large retailers.
Design tips and common pitfalls for hand-carved stamps
Knowing the tools and materials is one thing. Translating a design idea into a clean, functional stamp is another skill entirely. These practical tips address the most common challenges at every stage of the process.
Getting the design right from the start:
- Keep the design bold and simple, especially for a first attempt. Fine lines are the most common cause of failure.
- Bold, thick lines produce the clearest impressions and hold up over repeated use.
- Print or draw your design at the actual size the stamp will be, so there are no surprises when you carve.
- Transfer the design to the block using a pencil rubbing technique or transfer paper.
During carving:
- Carve large areas first before tackling details to avoid instability, and always cut away from your hands. Use sharp tools to prevent slips, test prints regularly, and note that bold thick lines work best while fine details risk breaking.
- Work iteratively. Take a test print every few minutes. It is far easier to remove more material than to add it back.
- Do not rush around curves or angles where the material is thin.
Common pitfalls:
- Forgetting to mirror text before carving is the most frequent mistake. Any letter or word must be carved in reverse so it prints correctly.
- Letters such as O, B, and 8 require the interior sections to be carved first, before the surrounding material is removed.
- Thin protruding elements, such as the tips of star points or narrow letter serifs, need enough surrounding material to support them. Without that support, they snap off under pressure.
- Unique stamp imprint ideas sometimes look excellent on paper but become impractical when translated into carved rubber. Test a simplified version first.
Pro Tip: If you encounter a flaw in your material, such as an air bubble or inconsistency in the rubber, simply flip the block and start on the other side. Experienced carvers routinely use both faces of a block. Starting over is not a failure; it is standard practice.
Carving errors with fine tools such as text and letters must be mirrored and carved with interiors first. Thin protruding elements need support thickness. Eraser flaws or material inconsistencies may require restarting on the block’s other side, and denser rubber is harder to carve, increasing the risk of injury if tools are dull.
Hand-carved stamps in action: uses for branding, crafts, and more
The range of practical applications for hand-carved stamps is wider than most people realise. Once you have a stamp that works, the uses multiply quickly.
For small businesses and independent sellers:
- Stamping kraft paper bags or tissue paper with a logo creates professional packaging without printing costs
- Tags and labels with a hand-stamped design stand out on market stalls and in online shop photographs
- Return address stamps for envelopes add a consistent branded touch to all outgoing post
- Stamping invoice slips or thank-you notes reinforces brand identity at minimal cost
For crafters and personal projects:
- Greeting cards with original hand-stamped designs feel genuinely personal
- Journals, planners, and notebooks can be personalised with repeat patterns or motifs
- Fabric stamping with fabric-friendly ink creates custom tote bags, tea towels, and cushion covers
- Gift wrap decorated with a repeat stamp pattern is both low cost and distinctive
The financial case is straightforward. One quality hand-carved stamp costing approximately £5 to £10 in materials can yield thousands of impressions, meaning the cost per use drops to a fraction of a penny very quickly. For a small business stamping 20 orders a day, that investment pays for itself in the first week.
Time investment varies considerably. Carving time ranges from 1 to 2 hours for simple eraser stamps up to 5 to 20 hours for detailed portrait or complex logo designs. A simple geometric logo, a monogram, or a plant motif sits comfortably at the lower end of that scale. The custom logo stamps and brand identity connection is clear: even a modest hand-carved mark, used consistently, builds recognition over time.
For those who want to scale up without carving everything personally, commissioning a specialist is entirely practical. Many small stamp businesses and individual makers offer custom stamp tips for small business buyers, guiding you through the options so the final product suits your exact need.
Our perspective: the value you cannot replicate with a click
There is a tendency in the stamp and printing industry to treat hand-carving as a beginner’s hobby, something you do before you can afford proper equipment. We disagree with that view fundamentally.
The businesses and makers who use hand-carved stamps do not do so because they lack access to digital alternatives. They choose the method because the result communicates something that perfectly reproduced machine output cannot. A slight irregularity in the impression of a logo on packaging tells the person receiving it that a human being was involved. That is not a defect. In a market where consumers are increasingly selective about where they spend money, that human trace is a competitive advantage.
There is also a practical durability argument that gets overlooked. A well-made hand-carved rubber or linoleum stamp, used with reasonable care, will outlast cheap pre-made stamps of equivalent size. The material is stable, requires no batteries, no software updates, and no reprinting of digital files. You press it, it works.
The real mistake is treating hand-carved stamps and professionally produced custom stamps as opposing choices. They are complementary. A hand-carved stamp works brilliantly for everyday packaging and craft use. A professionally produced stamp, ordered with precision from a reliable supplier, suits situations where you need exact logo reproduction at scale. Knowing which tool fits which job is the practical skill worth developing.
Explore custom stamp options for your own projects
Whether you are drawn to the craft of carving or prefer to order a professionally produced custom stamp, the most important step is starting with a clear idea of what you need.

At Stamp Design 4 U, custom stamp orders are handled for individuals and businesses across the UK and internationally. From logo stamps for product packaging to personalised designs for stationery and crafts, the range of options covers most use cases. If you know your design, the process is straightforward. If you are still working out what you need, the site’s product search and country-specific options make it easy to explore what is available before committing to an order. Custom stamps are one of those small investments that consistently deliver visible results.
Frequently asked questions
How long does it take to make a hand-carved stamp?
Simple rubber stamps can be completed in 1 to 2 hours, while detailed designs may require up to 20 hours depending on complexity.
Are hand-carved stamps durable?
A quality hand-carved stamp yields thousands of impressions from a single block, making them highly durable for regular use in both crafts and business applications.
What is the best material for a hand-carved stamp?
Soft rubber blocks and white erasers are most popular for beginners, while linoleum or wood is better suited to detailed or professional projects requiring crisp, consistent results.
Can I use a hand-carved stamp on fabric?
Yes. Provided you use fabric-friendly ink, hand-carved stamps work well on both paper and textiles, including cotton tote bags and tea towels.
Why do some designs break during carving?
Designs with thin lines or unsupported elements can break, particularly if fine details are carved before the surrounding material is removed, or if the design has not been mirrored correctly for text elements.