

Sealing wax is a resin-based mixture built for one job: melting fast, setting hard, and holding a crisp impression. The classic version blends shellac or lac resin with Venice turpentine, sometimes softened with a touch of beeswax, then coloured with pigment. Modern craft sticks often swap the historic resins for synthetic alternatives and non-toxic dyes, but the underlying logic hasn’t changed since the sixteenth century.
The ingredient groups that decide how any batch behaves are:
- Shellac or lac wax — the main binder, giving hardness and gloss
- Venice turpentine or rosin (colophony) — adjusts brittleness and working temperature
- Beeswax or carnauba wax — softens the blend and improves adhesion to paper
- Fillers (chalk, plaster/gypsum, magnesium carbonate) — bulk out cheaper wax, especially for jar seals
- Pigments — historically vermilion/cinnabar, red lead, and lampblack; today, safer synthetic colourants
- Modern synthetic resins — used in craft sticks to cut cost and toxicity risk
Most sealing wax melts at roughly 60–71°C, noticeably hotter than a typical candle. That single fact explains most of what makes it behave so differently once it hits paper or a stamp. Stampdesign4u works with plenty of customers who use wax seals alongside custom stamps, and the questions almost always start here: what’s actually in the stick, and why does it crack or smear?
Key Takeaways
Sealing wax works because its resin-based composition sets hard and brittle at a higher temperature than candle wax, holding fine stamped detail that soft, flexible waxes cannot.
| Point | Details |
|---|---|
| Core ingredients | Shellac or lac resin, Venice turpentine or rosin, beeswax, fillers, and pigment form the standard formula. |
| Avoid historic pigments | Vermilion, cinnabar, and red lead are toxic; use modern non-toxic colourants for any home crafting. |
| Shellac vs beeswax | Choose shellac-based recipes for crisp, durable impressions; reserve beeswax blends for historical re-creation. |
| Get the temperature right | Sealing wax melts around 60 to 71°C, hotter than candle wax, so timing the stamp press matters for clean detail. |
| Store and stamp carefully | Keep finished wax away from heat and sunlight, and pair it with a well-defined stamp from a supplier like Stampdesign4u for sharp results. |
Table of Contents
- What is sealing wax made of? A closer look at each ingredient
- How did sealing wax recipes change over time?
- How is sealing wax made at home?
- What tools do you need to apply sealing wax well?
- Is sealing wax the same as candle wax?
- How long does sealing wax last, and how should you store it?
- What are the alternatives to traditional sealing wax?
- Sealing wax ingredients at a glance
- Balancing authenticity and safety in sealing-wax crafting
- Where to find stamps built for sealing wax impressions
- Frequently asked questions
- Sources
What is sealing wax made of? A closer look at each ingredient
Shellac is a resin secreted by the lac insect, harvested mainly from trees in South and Southeast Asia. It’s thermoplastic, meaning it softens with heat and hardens again as it cools, which is exactly the property you want for stamping. Pure shellac alone sets very hard and rather brittle, which is precisely why it holds fine detail from a stamp so well but also why it can shatter if dropped.
Lac (the raw resin before it’s refined into shellac flakes) behaves similarly and appears in many older recipes interchangeably with shellac. The two terms get used loosely in historical sources, but functionally they do the same job: they’re the resin skeleton that everything else gets built around.
Venice turpentine, a thick oleoresin from the European larch tree, plays a different role entirely. It’s not a hardener, it’s a plasticiser. Add it to shellac and you lower the melting point, slow down the set, and reduce brittleness. Historical formulas cited by the 1911 Encyclopædia Britannica suggest ratios around 7 parts shellac to 4 parts Venice turpentine, with 3 to 4 parts vermilion pigment added on top. That balance mattered enormously to wax makers, because too little turpentine gives you a stick that snaps in a cold pocket, while too much leaves a sticky, slow-setting mess that never holds a crisp edge.
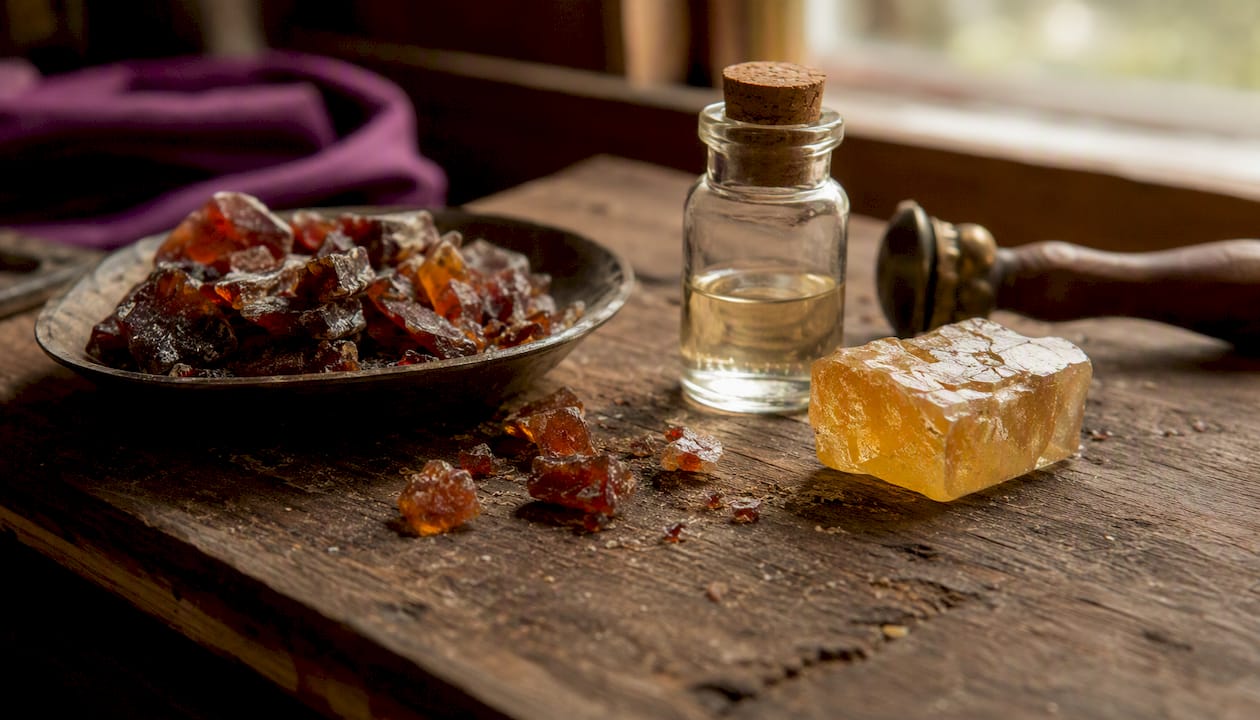
Rosin (colophony), distilled from pine resin, sometimes substitutes for or supplements turpentine in cheaper formulas. It’s harder and more brittle than turpentine on its own, so makers often used it in bulk wax where cost mattered more than flexibility.
Beeswax and, less commonly, carnauba wax, get folded in at low proportions, often just enough to soften the mix and help it grip paper fibres or cord rather than sitting on top like a hard shell. Too much beeswax, though, and the seal stays soft, smears under a stamp, and never achieves that glassy finish collectors prize.
Fillers such as chalk, plaster (gypsum), or magnesium carbonate bulk out the mix. Fine document wax uses very little filler, if any, because grit ruins a crisp impression. Jar-sealing wax, historically used to seal preserve jars or bottles, often used far coarser filler because appearance mattered less than cost and volume.
Pigments are where things get genuinely hazardous by modern standards. Vermilion and cinnabar (both forms of mercury sulphide) gave the classic deep red still associated with sealing wax today. Red lead provided an alternative orange-red. Lampblack (soot) produced black wax for mourning correspondence. All three were standard through the 18th and 19th centuries, and material analysis of surviving Russian and Western European seals confirms cinnabar and red lead turning up repeatedly across period samples, alongside beeswax and resin binders. None of these pigments belong in a home workshop today.
Pro Tip: Add pigment last, once the resin and plasticiser have fully melted together. Grind fine pigment powder into a small amount of the melted wax first to make a paste, then stir that paste back into the main batch. It stops the grainy, streaky colour that ruins an otherwise good pour.
How did sealing wax recipes change over time?
Sealing wax didn’t start as a shellac product. Early medieval seals leaned on beeswax mixed with resin or turpentine, largely because shellac simply wasn’t available in Western Europe yet.
- Early medieval period: beeswax plus local resins or Venice turpentine, sometimes coloured with whatever pigment was on hand
- 16th century onward: trade routes opened with the Indies, bringing shellac and lac into European workshops; formulas shifted decisively toward these harder, glossier resins
- 17th to 19th centuries: fillers and standardised pigments (vermilion for red, lampblack for black, occasionally verdigris for green) became common as sealing wax turned into a mass-produced stationery item rather than a household mixture
- State and official seals: often used distinct, more tightly controlled recipes than everyday correspondence wax, partly for security (harder-to-forge colours and finishes) and partly for prestige
Regional differences persisted even after shellac became standard. Comparative material studies of red pendant seals from the late 15th to early 18th centuries found Russian and Western European examples using different combinations of binder and pigment, evidence that local supply chains and workshop habits shaped formulas as much as any universal recipe did.
One charming detail survives in maker accounts: finished sticks were often finished by passing them briefly over a flame or hot charcoal, melting just the surface film to produce the glassy polish associated with fine sealing wax, a technique the 1911 Britannica entry describes in detail. Some workshops also perfumed their wax, a small luxury touch for correspondence between wealthier households.
How is sealing wax made at home?
You don’t need museum-grade ingredients to make a batch that seals well and looks the part. Two approaches work, depending on how historically faithful you want to be.
Historically inspired fine red wax follows something close to the ratio recorded in the 1911 Encyclopædia Britannica: roughly 7 parts shellac to 4 parts Venice turpentine to 3 or 4 parts pigment by weight. Substitute a modern, non-toxic red pigment such as iron oxide for vermilion, and you’ll get a similar depth of colour without the mercury.
Simple modern craft recipe uses shellac flakes (or a synthetic resin sold for candle and wax crafts) as the base, a small amount of beeswax for flexibility, and a commercial non-toxic colourant. It’s more forgiving for a first attempt because the working window is a little wider.
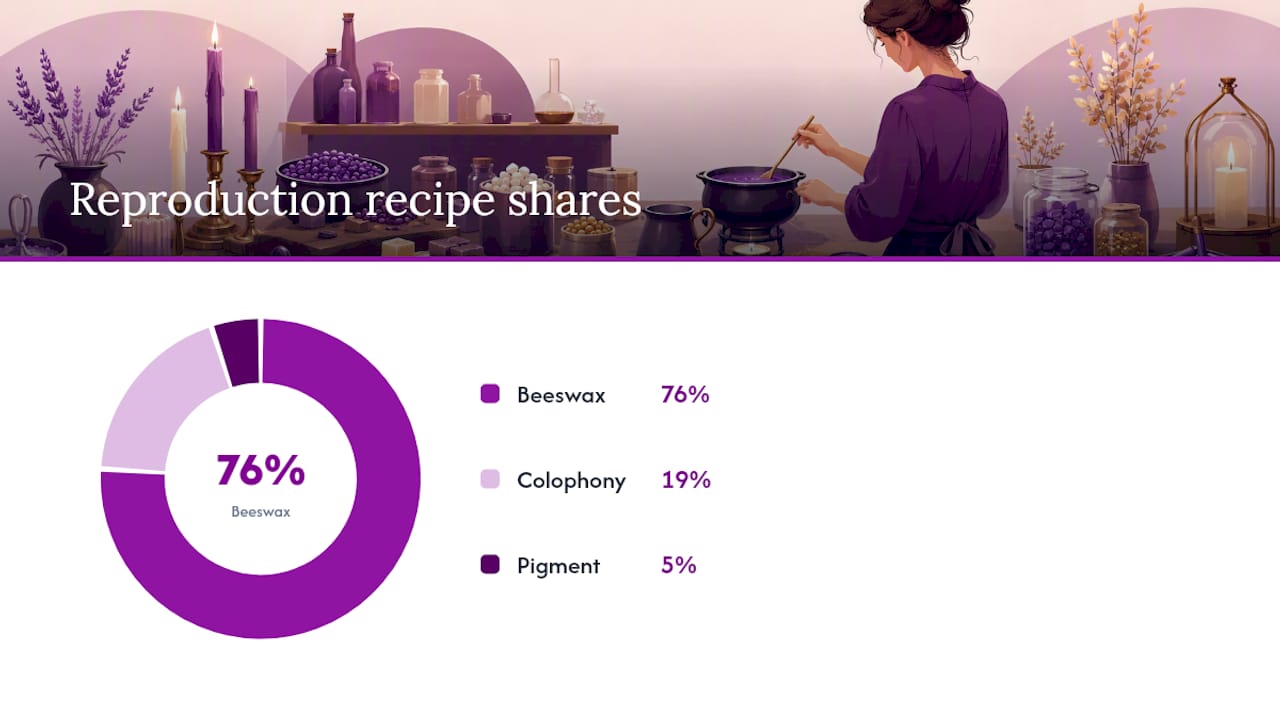
Practical maker experiments, including a documented reproduction test using a 16:4:1 ratio of beeswax to colophony to pigment, found that vigorous stirring and controlled temperature mattered more than exact proportions for getting a consistent finish.
- Melt the resin gently. Use a double boiler or a dedicated wax-melting pot rather than direct heat, keeping the temperature just above melting point.
- Add the plasticiser. Stir in Venice turpentine (or your chosen alternative) gradually, mixing thoroughly until the blend looks uniform.
- Fold in wax, if using. Add beeswax or carnauba in small increments, stirring continuously.
- Add pigment last. Stir in your pre-mixed pigment paste until the colour is even throughout, with no streaking.
- Pour or shape. Pour into moulds for sticks, or drop small beads onto a silicone mat for individual seal portions.
- Cool and knead. Once the wax is cool enough to handle but still pliable, knead it briefly and reheat the surface just slightly for a smoother finish.
- Store away from heat and direct sunlight until ready to use.
Work in a ventilated space, since melting resin can release fumes, and avoid direct high heat, which scorches shellac and produces a dull, discoloured stick. Never use vermilion, cinnabar, or red lead pigments. They’re genuinely toxic and there is no safe home-workshop equivalent to the museum-controlled handling those materials require.
If your finished stick turns out grainy, the pigment likely wasn’t fine enough or was added while the mix was too cool. Separation usually means the ratio of resin to turpentine is off, too much plasticiser and the wax never fully sets. Too brittle, and it needs more turpentine or a touch more beeswax; too soft, and it needs less.
Pro Tip: Knead the cooled mass by hand for a minute or two, then briefly warm just the surface again before final shaping. This distributes pigment evenly and gets rid of the grainy texture that ruins an otherwise good batch.
What tools do you need to apply sealing wax well?
Getting a clean impression is as much about technique as the wax recipe itself.
- Melting spoon — a traditional metal spoon with a long handle, held over a candle flame for small batches
- Low-temperature glue gun with wax-compatible sticks or beads, for faster, more consistent melting
- Candle warmer or wax melter — useful for larger projects or repeated seals
- Wickless melt beads — pre-measured, colour-matched beads designed for pouring directly onto envelopes
- Sealing wax sticks — the traditional format, melted directly with a flame
- Stamp — metal or resin, ideally with a design that has enough depth to hold in a slightly viscous medium
Working temperature affects everything downstream. Pour too cool and the wax won’t spread properly before it sets, leaving a lumpy, uneven pool. Pour too hot and it spreads too thin, taking longer to set and risking a smudged impression when you press the stamp.
Glue-gun wax tends to set faster than spoon-melted stick wax because the beads are formulated for quick application, which suits high-volume work like wedding invitations. Traditional stick wax, melted more slowly, gives you a bit more working time to get positioning right before it firms up.
Press the stamp straight down, hold for a few seconds without twisting, then lift cleanly. A stamp that’s been lightly pre-warmed (even just held near the melted wax’s heat for a moment) releases more cleanly than a cold one, which tends to drag and distort the fine lines of a detailed design. For genuinely glossy finishes, some makers still pass the cooled seal briefly near a spirit flame, echoing the historic finishing technique used on fine sticks centuries ago.
Pro Tip: Time your press to about three to five seconds after pouring, when the wax has stopped moving but hasn’t fully skinned over. Press too early and the stamp sinks in too far; press too late and the surface won’t take fine detail.
Is sealing wax the same as candle wax?
No, and using one for the other’s job usually shows; for example, the differences explained in coconut wax vs soy wax highlight how natural waxes behave differently, just as sealing wax and candle wax do. Sealing wax is engineered to be hard and brittle so it holds sharp detail and snaps rather than bends. Candle wax, whether paraffin, soy, or beeswax-based, is engineered to stay flexible and burn evenly, the opposite goal entirely.
- Sealing wax relies on shellac, lac, or rosin for hardness; candle wax relies on paraffin, soy, or beeswax for a stable, slow burn
- Sealing wax sets glossy and brittle; candle wax stays matte and pliable
- Sealing wax is formulated for adhesion to paper or cord; candle wax is formulated to hold a wick and burn cleanly
The temperature gap tells the real story. Sealing wax typically melts around 60 to 71°C, while common candle waxes melt closer to 49 to 60°C. That ten-to-twenty-degree difference means candle wax sets faster and softer, giving you less time to press a stamp cleanly and a seal that stays tacky and prone to smudging.
Candle wax can work in a pinch, if you genuinely have no sealing wax and need a quick decorative seal that won’t travel through the post. Expect a duller finish, a softer edge on the impression, and weaker adhesion to the paper, since it lacks the resin content that gives proper sealing wax its grip.
How long does sealing wax last, and how should you store it?
Composition determines how a seal ages, and the two main families age very differently. Beeswax-based historical seals lose unsaturated compounds over time, a chemical change confirmed by material analysis of aged beeswax artefacts, and that loss makes them measurably more brittle and prone to cracking decades or centuries later.
- Beeswax-based seals become increasingly fragile with age as their chemical structure shifts; handle historical examples minimally
- Shellac-based seals age differently, generally retaining more of their original hardness but remaining vulnerable to impact damage if dropped or knocked
- Stable temperature and low humidity slow deterioration in both types
- Avoid direct sunlight, which accelerates chemical breakdown in resins and waxes alike
- Consult a professional conservator before cleaning, repairing, or handling any historically significant seal
Laboratory studies using hydrogenated beeswax as a model material found that the loss of unsaturated compounds is a plausible mechanism behind this increasing fragility, giving conservators a scientific basis for handling protocols on genuinely old wax seals. For a hobbyist’s own creations, storage is simpler: a cool, dark drawer away from radiators or direct sun keeps sticks and finished seals stable for years.
What are the alternatives to traditional sealing wax?
Not every use case calls for shellac and Venice turpentine. Modern crafters and businesses have several practical substitutes, each suited to a different job.
- Flexible sealing wax sticks — formulated with added plasticisers so the seal survives bending in transit; ideal for posted parcels and letters
- Low-temperature glue-gun beads — fast, consistent, minimal mess; good for high-volume decorative work like invitations
- Pre-made wax beads — pigmented and ready to melt, saving the mixing step entirely
- Epoxy or resin seals — extremely durable and glossy, but not authentic wax at all; better suited to permanent decorative pieces than traditional envelope seals
Flexible wax trades some historical authenticity for practicality, since traditional brittle shellac formulas genuinely can crack in a postbag. Glue-gun beads offer speed and consistency but rarely match the glass-like finish of a well-poured traditional stick. Epoxy holds up almost indefinitely but won’t satisfy anyone after genuine historical accuracy.
For shipping parcels, flexible wax is the sensible pick. For decorative craft projects that won’t travel, glue-gun beads or epoxy both work well. For historical re-creation, whether for education, re-enactment, or collecting, shellac and lac-based recipes remain the only option that’s actually faithful to the period.
Sealing wax ingredients at a glance
| Material | Primary Function | Effect on Wax | Safety Note |
|---|---|---|---|
| Shellac / lac | Main binder resin | Hard, glossy, brittle | Generally safe to handle; source from craft suppliers |
| Venice turpentine | Plasticiser | Lowers melting point, reduces brittleness | Ventilate workspace when melting |
| Rosin (colophony) | Hardener/bulking resin | Increases hardness and brittleness | Can cause skin sensitivity in some people |
| Beeswax | Softener, adhesive aid | Softer set, better grip on paper | Safe for craft use |
| Carnauba wax | Softener alternative | Adds slight gloss, moderate softening | Safe for craft use |
| Chalk / gypsum | Filler | Bulks volume, cheapens mix | Avoid inhaling fine dust |
| Vermilion / cinnabar | Historic red pigment | Deep red colour | Contains mercury; do not use in home crafting |
| Red lead | Historic orange-red pigment | Vivid orange-red colour | Toxic lead compound; avoid entirely |
| Lampblack | Historic black pigment | Deep black colour | Modern carbon-based versions are safer alternatives |
Museum-grade reagents exist for conservators reproducing historical formulas under controlled conditions, but hobbyists should stick to craft suppliers offering modern, certified non-toxic pigments. There’s no meaningful craft benefit to sourcing genuine cinnabar when an iron-oxide red gets you a nearly identical shade without the risk.
Pro Tip: If a supplier doesn’t list pigment safety data or certification, assume it’s not intended for skin-adjacent craft use and ask before buying.
Balancing authenticity and safety in sealing-wax crafting
Working through the history of these recipes, one thing stands out: the people who wrote them down a century or two ago weren’t thinking about mercury exposure, and a lot of the “authentic” advice still floating around craft forums quietly repeats pigments nobody should be melting on a stovetop today. My own preference leans firmly toward shellac-based recipes with modern, non-toxic colourants for anyone doing regular craft work. They set hard, they hold fine detail from a stamp cleanly, and they don’t carry any of the handling risk that vermilion or red lead do.
Beeswax-heavy blends still earn their place, but mainly in historical re-creation contexts where the point is fidelity to a specific period recipe rather than everyday practicality. If you’re teaching students about medieval sealing methods, a beeswax and colophony blend genuinely illustrates something a modern synthetic stick can’t. For anyone sealing wedding invitations or parcels week after week, though, durability and safety should win over strict authenticity every time. Writing about stamping and impression tools for Stampdesign4u has made this trade-off obvious: the best-looking seal is worthless if the ingredients that made it aren’t something you’d want on your hands.
Where to find stamps built for sealing wax impressions
Wax composition only gets you halfway to a good seal, the stamp doing the pressing matters just as much. A shallow or worn design won’t hold detail in wax no matter how carefully you’ve balanced your shellac-to-turpentine ratio, which is exactly why Stampdesign4u focuses on producing stamps with genuine depth and clarity in the design face.
If you’re setting up for regular wax sealing, whether for wedding stationery, packaging, or branded correspondence, a personalised logo stamp gives you a design that holds up to repeated pressing without losing definition. Businesses shipping parcels alongside a wax seal often pair that with personalised packaging stamps for consistent branding across every box that goes out the door. Browse the current range and find a stamp built to match your design, then place an order to get a proof before production begins.
Frequently asked questions
What is sealing wax made of, in simple terms? Sealing wax is mainly resin, historically shellac or lac, blended with a plasticiser like Venice turpentine, sometimes a little beeswax, and coloured with pigment. Modern craft versions often substitute synthetic resins and safer dyes.
Can I use candle wax instead of sealing wax? You can in an emergency, but the result will be duller, softer, and less adhesive, since candle wax lacks the resin content that gives proper sealing wax its hard, glossy set.
Why does my homemade sealing wax turn out grainy? Grainy texture usually means pigment was added too coarse or stirred in while the mix was too cool. Grind pigment into a small paste of melted wax first, then blend it into the full batch.
Is it safe to use vermilion or red lead pigment at home? No. Both contain toxic heavy metals and require museum-grade controls to handle safely. Use modern, certified non-toxic pigments for any craft project.
How long does a wax seal actually last? It depends on composition. Beeswax-based seals become more brittle with age as their chemical structure changes, while shellac-based seals tend to retain hardness longer but remain vulnerable to impact.
Sources
- 1911 Encyclopædia Britannica / Sealing Wax
- Sealing wax — Wikipedia
- Why do historical beeswax seals become brittle over time? — PMC
- On Making Wax Seals; Or, Why Instructions Matter – Imprint Project (Lincoln)
- Mechanical properties of aged beeswax — DOI (2018)