TL;DR:
- Custom rubber stamps provide cost-effective, adaptable branding with tactile customer engagement.
- Proper design and application techniques ensure professional, consistent impressions across various surfaces.
- Physical stamping enhances brand memorability in a digital-dominated marketplace.
Standing out on a tight budget is one of the most persistent challenges facing small business owners. Every pound spent on marketing needs to work hard, yet printed labels, stickers, and digital adverts can eat through your budget faster than expected. Custom rubber stamps offer something different: a one-time investment that delivers thousands of impressions at a fraction of the ongoing cost. This article walks you through exactly why stamps work, what tools you need, how to apply them correctly, and how to avoid the mistakes that undermine results.
Table of Contents
- Why stamps work for small business branding
- What you need: Tools, materials and design considerations
- Step-by-step: Applying your brand with stamps
- Troubleshooting, optimisation and business uses
- Why old-school still wins: The tactile advantage in a digital era
- Ready to elevate your brand with custom stamps?
- Frequently asked questions
Key Takeaways
| Point | Details |
|---|---|
| Cost-effective branding | Using custom stamps is cheaper than printed labels for most small businesses. |
| Personal, tactile appeal | Stamps foster a memorable, hands-on brand experience for your clients. |
| Flexible for many uses | Custom stamps can be applied to various surfaces, materials, and business assets. |
| Easy to learn and implement | With a few tools and simple care, anyone can achieve professional, repeatable branding. |
Why stamps work for small business branding
Small businesses rarely have the luxury of large marketing budgets. Yet brand consistency matters enormously. Every time a customer receives your packaging, a receipt, or a loyalty card, that interaction is a branding opportunity. The question is whether you can afford to maximise it.
Custom rubber stamps solve this problem directly. Unlike printed labels, which require minimum order quantities and become outdated the moment your address, logo, or tagline changes, stamps are immediately adaptable. You can order a new stamp for a few pounds and start using it that same week. Printed labels, by contrast, might sit in a stockroom for months, displaying outdated information. As flexible branding tools for low minimum order quantities, stamps give small businesses a speed advantage that larger competitors rarely think about.
There is also a sensory dimension that digital branding simply cannot replicate. A stamped impression on kraft paper packaging, a hand-finished gift box, or a loyalty card creates a physical, tactile experience. The customer can feel the slight texture of the ink. They see that a human hand applied it. That small detail signals care and attention. It is the difference between receiving a parcel that feels like it was processed by a warehouse robot and one that feels considered. For branding expertise built on genuine connection, that physical moment is invaluable.
Here is a quick summary of where stamps outperform other branding methods:
- Cost per impression: A quality stamp costs a fixed amount and produces thousands of uses. Stickers cost per unit.
- Update speed: Need to change your tagline? Order a new stamp in days, not weeks.
- Surface flexibility: Paper, card, fabric, and more. One stamp, many applications.
- Minimum quantities: No bulk orders required. Stamp one item or one thousand.
- Brand personality: Handcrafted impression signals authenticity, not mass production.
You can use custom logo stamps across packaging, thank-you cards, receipts, swing tags, and promotional inserts without any additional per-unit cost once you have your stamp.
“Businesses that invest in tactile branding tools, including custom stamps, consistently report stronger customer recall and a more distinctive brand presence than those relying solely on digital touchpoints.”
Pro Tip: If you are launching a new product line or seasonal promotion, a stamp lets you update your packaging branding immediately without reprinting existing stock. Simply stamp over plain or neutral packaging and your brand identity is instantly applied.
Understanding how stamps support brand identity with stamps is the foundation. Once that is clear, the next step is making sure you have the right materials ready.
What you need: Tools, materials and design considerations
Getting your stamp setup right from the beginning saves a great deal of frustration later. The wrong ink on the wrong surface produces smudged, unprofessional results. The wrong stamp body for your volume of use leads to inconsistency and fatigue.
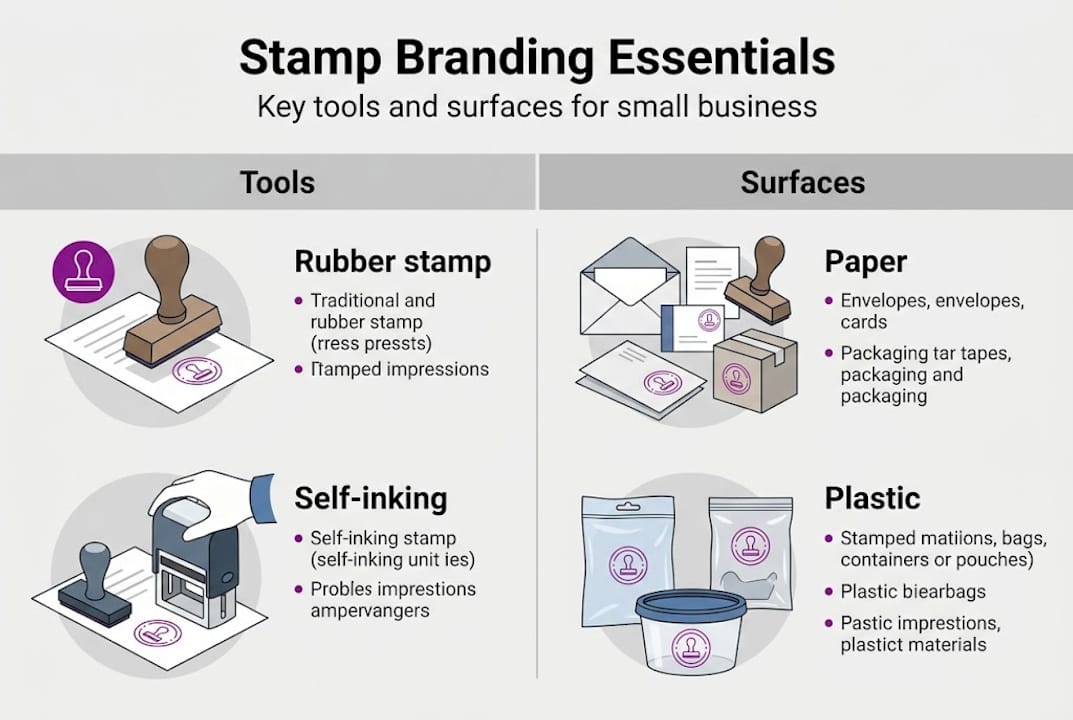
Here is an overview of the core tools and their typical branding applications:
| Tool | Best for | Ideal surface | Notes |
|---|---|---|---|
| Traditional rubber stamp | Low-volume, artisan branding | Paper, card | Requires separate ink pad |
| Self-inking stamp | Medium to high volume | Paper, card | Re-inks automatically; fast and consistent |
| Pre-inked stamp | High detail, professional finish | Paper | Long lifespan; crisp impression |
| Solvent-based ink pad | Non-porous surfaces | Plastic, metal, glass | Brands such as StazOn work well here |
| Archival ink pad | Paper documents, packaging | Paper, card | Fade-resistant; important for receipts |
Choosing the right combination is not complicated, but it does require knowing your primary use case. A small bakery stamping kraft paper bags needs a different setup to a retailer stamping loyalty cards, receipts, and mailers every day. For high-volume daily use, self-inking or pre-inked stamps are the practical choice. They are more durable and require less manual re-inking.
Design is where many businesses stumble. A logo that looks excellent on a website or business card can become a blurry mess when reduced to stamp size. A few important design rules apply:
- Keep it simple: Intricate details and thin lines do not transfer well. Bold, clean shapes work best.
- Minimum text size: Text below 6pt is very difficult to stamp legibly. Stick to key details only.
- Balanced layout: Avoid cramming too much into one stamp. White space makes your mark look more professional.
- Ink colour strategy: Match your ink colour to your brand palette wherever possible.
You will find a practical business stamp layout guide useful when preparing your artwork, particularly if you are working with a logo that has not been adapted for stamping before.
Understanding branding 101 principles helps at this stage too. Your stamp is not just a mark. It is a brand asset. Treat it with the same care you would apply to a business card design.
Pro Tip: For stamping on non-paper surfaces such as plastic packaging, cellophane, or metal tins, use a solvent-based ink like StazOn. Standard water-based inks will bead and smear immediately. Testing on a scrap piece of your actual material before committing to a full run saves wasted stock.
Knowing how to personalise company stamps with the correct design specifications ensures that what you order matches what you need, every time.
Step-by-step: Applying your brand with stamps
Having the right stamp and ink is only part of the process. Application technique determines whether your brand impression looks sharp and professional or inconsistent and amateurish.
![]()
Before beginning any stamping session, always test on scrap material of the same type you will be stamping. This sounds obvious, but it is the single step most people skip. Surface texture, absorbency, and temperature all affect how ink transfers.
Follow these steps for a consistent, professional result every time:
- Ink the stamp evenly. Press the stamp face gently onto the ink pad two or three times. Do not drag it across the pad, as this causes uneven coverage. For self-inking stamps, a single press is sufficient.
- Position carefully. Use a light pencil mark, masking tape guide, or a simple jig (a piece of card fixed as a border) to line up the stamp consistently across multiple items.
- Apply steady, even pressure. Press the stamp straight down without rocking or twisting. Apply firm pressure across the whole face of the stamp. Rocking causes double impressions and blurred edges.
- Lift straight up. Remove the stamp in one clean, vertical motion. Sliding or twisting as you lift smears the impression.
- Allow the ink to dry fully. Do not stack or pack stamped items immediately. Drying time varies by ink type and surface, but waiting at least 30 seconds avoids smearing.
- Clean after each session. Wipe the stamp face with a damp cloth or specific stamp cleaner. Dried ink in fine details degrades print quality over time.
Here is a quick comparison of the three main stamp types to help you choose correctly for your volume and use case:
| Stamp type | Speed | Volume suitability | Detail quality | Best use |
|---|---|---|---|---|
| Traditional | Slow | Low | Variable | Artisan, occasional use |
| Self-inking | Fast | High | Consistent | Daily office or retail use |
| Pre-inked | Medium | Medium to high | Excellent | Professional detail, long runs |
“Clean your stamp after every use, particularly when switching between ink colours or surface types. Residual ink builds up in fine lines and degrades the sharpness of your impression over repeated sessions.”
Following clear brand guidelines ensures your stamped branding stays consistent across different team members or locations. Document your ink colour codes, positioning rules, and surface types so anyone handling your packaging can apply the stamp correctly.
For a thorough walkthrough, the stamp application guide covers additional techniques for awkward surfaces and irregular shapes. If you are building a broader system, the branding with stamps guide shows how to integrate stamp branding across all your customer touchpoints.
Troubleshooting, optimisation and business uses
Even with the right technique, problems occur. Recognising what has gone wrong and knowing how to fix it quickly keeps your branding consistent.
Here are the most common stamping mistakes and their practical fixes:
- Smudged impression: Caused by rocking the stamp or moving it before the ink dries. Fix: Apply firm vertical pressure and wait longer before touching the stamped area.
- Uneven ink coverage: Caused by insufficient or uneven inking. Fix: Re-ink more thoroughly and ensure the ink pad is not dried out.
- Off-centre placement: Usually a setup problem. Fix: Create a positioning guide from card or use masking tape borders before starting a run.
- Fading or patchy ink on non-paper surfaces: Caused by using water-based ink on non-porous materials. Fix: Switch to solvent-based ink suited to that surface type.
- Ink bleeding or spreading: Caused by over-inking or highly absorbent surfaces. Fix: Use less ink and test on the specific material in question.
Once your technique is reliable, stamps open up a surprisingly wide range of business applications. Most people think of packaging first, but that is only the starting point. Consider these uses:
- Loyalty and reward cards stamped with each purchase
- Thank-you notes and hand-finished card inserts inside parcels
- Plain paper bags or tissue paper given branded identity instantly
- Receipts and invoices stamped with your logo for a professional finish
- Promotional materials at markets, fairs, or pop-up events
- Swing tags on products, workshop materials, or handmade goods
The qualitative benefits are well-documented. While direct ROI metrics from stamp branding alone are difficult to isolate, businesses consistently report that stamped branding improves perceived professionalism and reinforces brand recall among repeat customers. The efficiency gains are also real. Stamping 200 loyalty cards takes minutes, whereas outsourcing the same run to a printer introduces lead times, minimum quantities, and cost.
Pro Tip: For direct mail campaigns, a stamped logo on the envelope immediately distinguishes your letter from standard post. Customers who receive personalised physical mail are significantly more likely to open it than standard printed envelopes. Pair this with a stamped loyalty card inside for a complete, branded experience.
Explore more ideas through our custom stamp uses resource and find additional detail on technique in our custom stamp tips guide. Thinking about how tone of voice in branding connects with physical brand touchpoints can also strengthen the overall impact of your stamped materials.
Why old-school still wins: The tactile advantage in a digital era
Most small business branding advice points straight to digital: social media, email campaigns, paid adverts, and website optimisation. These tools have genuine value, but they also create a problem. When every business communicates through the same digital channels, everything starts to look and feel identical. Feeds scroll past. Emails get deleted. Adverts are filtered out.
Physical branding cuts through that noise. A stamped logo on packaging is not skippable. The customer holds it, sees it, and touches it. That moment of physical contact creates memory in a way that a banner advert simply does not. Research consistently shows that tactile branding generates stronger emotional associations than purely visual or digital equivalents.
The uncomfortable truth is that most small businesses overlook stamps entirely because they seem old-fashioned. That instinct is exactly wrong. In a market saturated with digital content, a physical impression is now the differentiator. The businesses investing in the impact of branding stamps today are building a brand presence that is genuinely distinctive, at very low cost. The question is not whether stamps are relevant in 2026. It is whether you can afford to ignore them while your competitors discover this advantage first.
Ready to elevate your brand with custom stamps?
Putting the guidance in this article into practice starts with having the right stamp for your specific needs.

The Trodat 4927 logo stamp is an excellent choice for businesses wanting a professional self-inking stamp capable of handling logos and multi-line text consistently across high volumes. For businesses running loyalty programmes, the Traxx 9021 loyalty stamp delivers a compact, precise impression suited to card-based reward schemes. Both are available to order and customise directly, with support available if you need guidance on design specifications or ink selection. Your branded impression is closer than you think.
Frequently asked questions
Are custom rubber stamps cost-effective for small runs?
Yes, a quality custom stamp can produce thousands of impressions from a single purchase, making it considerably cheaper per unit than ordering printed labels or stickers in small quantities.
Which surfaces can be stamped for branding purposes?
With the correct ink selection, you can stamp paper, cardboard, fabric, some plastics, and even metal. The key is matching ink to surface, using archival inks for paper and solvent-based inks for non-porous materials.
What is the difference between traditional, self-inking, and pre-inked stamps?
Traditional stamps require a separate ink pad, whereas self-inking and pre-inked stamps re-ink automatically with each press. For high-volume daily use, self-inking and pre-inked options are more practical and consistent.
Does using custom stamps increase sales directly?
Stamps support branding that improves perceived professionalism and customer recall, but direct sales uplift is typically inferred from qualitative feedback rather than hard metrics, as isolating stamp branding as a single sales variable is difficult in practice.