
TL;DR:
- Step-by-step stamp customization involves creating a personalized rubber stamp tailored to specific designs or branding needs. Proper preparation, design, and testing ensure high-quality results whether done DIY or through professional services.
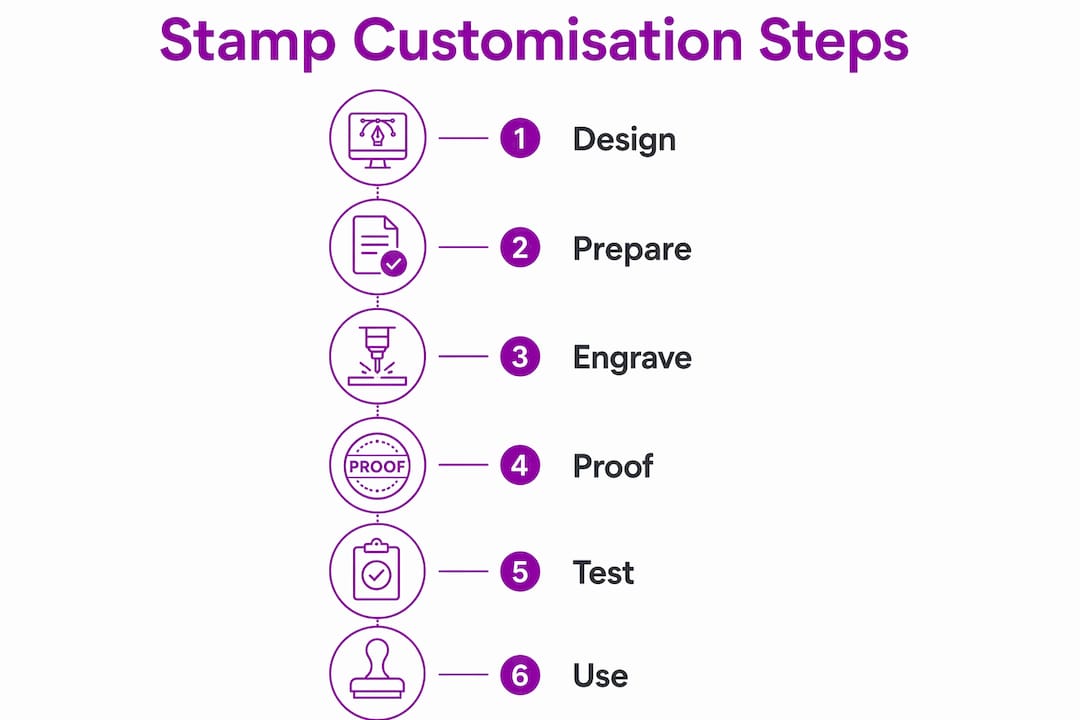
Step by step stamp customisation is the process of creating a personalised rubber stamp tailored exactly to your design, branding, or personal requirements. Whether you are a small business owner marking packaging with a logo or a crafter adding a personal touch to stationery, the stamp creation process follows the same core stages: design, artwork preparation, production, and testing. Tools like Adobe Illustrator, Canva, and services from brands such as Trodat and Stampdesign4u make the process accessible at every skill level. Getting each stage right from the start saves time, money, and frustration.
What are the essential tools and materials for stamp customisation?
The right tools determine whether your finished stamp is crisp or blurry. Before you begin any stepwise stamp design work, gather what you need based on whether you are going the DIY route or ordering from a professional service.
Design software is your starting point. Adobe Illustrator and Inkscape are the standard vector editors for stamp artwork. Canva works for simple designs but exports raster files, which require a minimum of 300 DPI at final stamp size, with 600 DPI preferred for finer detail. Vector files built from paths scale without any quality loss, making them the preferred format for professional production.
Physical materials for DIY stamps include rubber sheets (typically 3–6mm thick), wooden or acrylic mounting blocks, contact adhesive, and a laser engraver such as a desktop xTool or similar compact unit. For professional services, you simply need your artwork file and a reliable supplier.
| Tool or Material | Best For | Limitation |
|---|---|---|
| Adobe Illustrator | Vector artwork, complex logos | Paid subscription required |
| Inkscape | Free vector editing | Steeper learning curve |
| Canva | Simple text and shape designs | Raster output only |
| Rubber sheet (DIY) | Full creative control | Requires engraving equipment |
| Professional service | Speed, quality, no equipment needed | Less hands-on control |
Pro Tip: Check your line weights and font sizes before you do anything else. Fixing a 0.3pt line at the design stage takes seconds. Fixing it after engraving costs you a sheet of rubber and an hour of your time.
How to prepare your artwork for stamp design
Artwork preparation is where most custom stamp projects succeed or fail. The design-to-production handoff is a dimensional challenge. Stable geometry and correct font sizes must survive physical engraving and repeated stamping use.
The single most important rule is to design at actual stamp size. Designing large and scaling down distorts proportions and causes the engraving machine to misread fine details. If your stamp will be 60 x 40mm, your artboard must be exactly 60 x 40mm.
Engraving technology reads artwork as a binary decision: engrave or do not engrave. That means gradients cause production errors because the machine cannot interpret shades of grey. Your artwork must be pure black and white with no grey tones, shadows, or transparency.
Here are the non-negotiable design rules for a successful stamp:
- Use black and white only. Remove all gradients, grey fills, and drop shadows.
- Keep line weights above 0.5pt; 1pt or above is safer for durability.
- Fonts below 8pt are destroyed during engraving. Use 8pt as your absolute minimum.
- Save files as AI, EPS, or SVG for vector. Use PNG or TIFF at 600 DPI for raster.
- Mirror your artwork horizontally before sending to a laser engraver. Skipping this step produces a backwards impression.
- Outline all fonts so they do not rely on installed typefaces during production.
- Leave a small border around your design to protect edge details from cutting.
Pro Tip: Convert your design to greyscale in your software and zoom to 100% before exporting. If anything looks unclear at actual size on screen, it will look worse on rubber. Fix it now.
Stampdesign4u’s guide on preparing stamp artwork covers file format requirements in detail and is worth reviewing before you submit any artwork to a professional service.
Step-by-step: DIY vs professional stamp creation
Both routes produce excellent results when followed correctly. The choice depends on your budget, equipment, and how much control you want over the process.
The DIY laser engraving process
- Prepare your rubber sheet by cutting it slightly larger than your final stamp size.
- Mirror your design horizontally in your software before exporting.
- Set your laser engraver to lower power with slower speed. Multiple passes at lower power produce cleaner edges than a single high-power pass.
- Engrave the design first. Cut the outline after engraving to prevent the rubber from shifting during the engraving phase.
- Clean the engraved stamp with warm water and mild dish soap to remove debris.
- Mount the rubber onto a wooden or acrylic block using contact adhesive.
- Test the impression on scrap paper before use.
The professional service process
- Finalise your artwork following the design rules above.
- Upload your file to your chosen supplier, such as Stampdesign4u.
- Review and approve the digital proof. Never skip this step. Approving a proof before production is the single most effective way to avoid costly errors.
- Confirm production and delivery timelines.
- Test the finished stamp on scrap paper when it arrives.
| Factor | DIY | Professional Service |
|---|---|---|
| Cost | Lower (equipment investment upfront) | Per-unit cost, no equipment needed |
| Quality control | Depends on your skill and settings | Consistent, production-grade results |
| Turnaround | Immediate once set up | Typically 2–5 working days |
| Best for | Hobbyists, frequent makers | Businesses, one-off orders |
Pro Tip: For DIY engraving, run a test pass on a scrap piece of the same rubber before committing to your final sheet. Rubber density varies between brands, and your laser settings may need adjusting.
How to proof, test, and troubleshoot your custom rubber stamp
Testing is not optional. A stamp that looks perfect on screen can still produce a poor impression if the ink coverage, pressure, or design has a flaw. This stage of the personalised stamp tutorial is where you catch problems before they reach customers or important documents.
Start with scrap paper. Press the stamp firmly and evenly, without rocking it. Lift cleanly. Examine the impression under good light. Look for broken lines, uneven ink coverage, and any areas where detail has been lost.
Common problems and their fixes:
- Blurry lines: Too much ink or too much pressure. Use a lighter touch and re-ink less frequently.
- Missing detail: Fine lines or small text were below the minimum threshold. Redesign with heavier line weights.
- Uneven coverage: The mounting block is not flat. Re-mount the rubber on a level surface.
- Ink bleeding: The rubber surface has debris from engraving. Clean with warm water and mild soap and test again.
- Backwards impression: You forgot to mirror the artwork. This requires re-engraving.
For ongoing maintenance, clean your stamp after every use with a damp cloth or stamp cleaner. Store it face-down on a clean surface or in a protective case. Avoid leaving ink to dry on the rubber, as dried ink clogs fine detail and shortens the stamp’s life.
Pro Tip: Stamp onto a piece of white card stock rather than plain paper for your first test. Card stock gives a more accurate impression of how the stamp will perform on packaging or branded materials.
Creative applications for your personalised rubber stamp
A custom rubber stamp is one of the most cost-effective branding tools available to small businesses. The physical impression it leaves on packaging, paper, or fabric creates a tactile quality that digital printing cannot replicate.
For small businesses, the most practical applications include:
- Stamping your logo on kraft paper bags, tissue paper, or cardboard boxes for branded packaging.
- Adding a “Thank You” or quality mark to order inserts and receipts.
- Creating loyalty card stamps using compact designs like the Traxx 9021 Loyalty Stamp for retail or café use.
- Marking invoices, documents, or correspondence with address or approval stamps.
For personal and craft use, stamps work well for:
- Personalising gift wrap, cards, and envelopes.
- Adding repeat patterns to fabric or paper for handmade products.
- Creating consistent branding across handmade goods sold at markets or online.
- Decorating journals, notebooks, and scrapbooks with custom motifs.
The Stampdesign4u guide on branding with custom stamps shows how businesses have used stamps to create a consistent, professional look across physical touchpoints without significant cost. A well-designed stamp used consistently across packaging and correspondence builds brand recognition in a way that feels personal and considered. For personalised print ideas beyond stamps, personalising prints for gifts offers further inspiration for creative applications.
What i have learned from stamp customisation projects
The most common mistake I see is treating stamp design like screen design. People bring in logos with thin hairlines, gradient shadows, and tiny 6pt footnotes. Those elements look polished on a monitor. On rubber, they disappear or bleed into each other. The engraver does not care how good your brand guidelines are.
The second mistake is skipping the proof stage. I have seen businesses order 50 stamps without approving a proof, only to discover the address was wrong or the logo was slightly off-centre. A proof takes minutes to review and costs nothing. Skipping it can cost you the entire order.
What I find genuinely useful is starting with a simpler version of your design than you think you need. Strip it back. Remove the fine detail. See how it stamps. Then add complexity only if the simpler version does not meet your needs. Most of the time, the simpler version is actually better.
DIY laser engraving has become far more accessible in recent years. Desktop units from brands like xTool have brought the process within reach of small makers. The learning curve is real, but the control you gain over your own production is worth it if you make stamps regularly. For one-off or business-critical orders, a professional service remains the more reliable choice.
— Steven
Order your custom stamp from Stampdesign4u
Stampdesign4u offers a straightforward way to order professional rubber stamps without needing design expertise or specialist equipment.

The Trodat 4927 9 Line Logo and Text Rubber Stamp is one of the most popular choices for small businesses needing a reliable, high-quality stamp for logos and text at 60 x 40mm. Upload your artwork, approve your digital proof, and receive your finished stamp with fast UK delivery. Stampdesign4u’s team provides support throughout the process, from logo to finished stamp, making it straightforward for first-time buyers and experienced users alike. Browse the full range at Stampdesign4u to find the right stamp for your needs.
Key takeaways
Successful stamp customisation depends on production-ready artwork, correct engraving sequence, and thorough testing before use.
| Point | Details |
|---|---|
| Design at actual stamp size | Designing at final dimensions prevents detail loss and engraving machine errors. |
| Use black and white artwork only | Gradients and grey tones cause production errors; pure black and white is required. |
| Maintain minimum line weights | Keep line weights above 0.5pt and fonts at 8pt or above to survive engraving. |
| Mirror artwork before DIY engraving | Horizontal mirroring before engraving prevents backwards text and graphics. |
| Always approve a proof | Reviewing a digital proof before production avoids costly and irreversible mistakes. |
FAQ
What file format is best for custom stamp artwork?
Vector formats such as AI, EPS, or SVG are preferred because they scale without quality loss. If using raster images, supply them at a minimum of 300 DPI at final stamp size, with 600 DPI recommended for fine detail.
Why must stamp designs be black and white?
Engraving technology reads artwork as a binary instruction: engrave or do not engrave. Gradients and grey tones cannot be interpreted correctly, which causes uneven or failed engraving results.
Do i need to mirror my design before engraving?
Yes. Mirroring your artwork horizontally before laser engraving is a required step. Without it, all text and directional graphics will stamp in reverse.
What is the minimum font size for a readable rubber stamp?
Fonts below 8pt are typically destroyed during the engraving process. Use 8pt as your absolute minimum, and opt for bold or medium weight typefaces over thin or light variants.
How do i clean and maintain a rubber stamp?
Clean your stamp after each use with a damp cloth or dedicated stamp cleaner. For engraved stamps, warm water and mild dish soap remove debris effectively and help maintain a sharp impression over time.