
TL;DR:
- Mail art stamps can be creatively crafted from upcycled objects, adding unique textures no commercial stamp can achieve.
- Incorporating vintage design elements and official commemorative stamps enhances the character and visual interest of mail art pieces.
Mail art stamp ideas are everywhere once you know where to look, yet most hobbyists cycle through the same half-dozen approaches and wonder why their envelopes feel repetitive. Transforming envelopes into art pieces is fundamental to the entire practice, and the stamp is the tool that makes it happen. Whether you are posting a handmade card to a friend or contributing to a global art exchange, the stamps you choose and create define the personality of every piece you send. This list covers ten specific, practical ideas to push your work further.
Table of Contents
- Key takeaways
- 1. Mail art stamp ideas from upcycled objects
- 2. Designing faux vintage postage stamps
- 3. Incorporating official commemorative stamps
- 4. Adding texture and dimension to stamps
- 5. Nature-printed stamps using plants and botanicals
- 6. Geometric and abstract pattern stamps from foam sheets
- 7. Screen printing simple repeat motifs
- 8. Wax seal stamps as a finishing technique
- 9. Using stamps in mail art exchanges and postcard swaps
- 10. Personalised custom rubber stamps for mail art signatures
- My take on mail art stamp creativity
- Take your mail art further with Stampdesign4u
- FAQ
Key takeaways
| Point | Details |
|---|---|
| Upcycled objects make stamps | Everyday items like bottle caps and leaves create distinctive textures no commercial stamp can replicate. |
| Waterproof ink matters in post | Use inks like Stazon to prevent smudging during transit when moisture is a risk. |
| Community exchanges spark ideas | Participating in swaps gives you real deadlines and genuine inspiration from other artists. |
| Vintage design elements add depth | Borders, cancellation marks, and aged typography transform a plain stamp into a storytelling device. |
| Custom rubber stamps scale your practice | A personalised rubber stamp from Stampdesign4u lets you repeat a motif consistently across dozens of pieces. |
1. Mail art stamp ideas from upcycled objects
One of the most overlooked sources of mail art stamp ideas is the recycling bin. Bottle caps, lace offcuts, corrugated cardboard, leaves, and even the cut ends of celery all transfer ink in ways that no bought stamp can reproduce.
To prepare a found object for stamping, pat it dry and apply ink with a small roller or foam dauber rather than pressing it directly onto an ink pad. This gives you much more control over coverage, especially with irregular surfaces. Test on scrap paper first because the first impression is rarely the clearest.
- Bottle caps create precise circular borders ideal for faux postal cancellation marks
- Bubble wrap produces a honeycomb pattern that works beautifully as a background texture
- Leaf skeletons press onto paper with extraordinary botanical detail
- Lace scraps roll ink over the top and lay flat onto your envelope for an instant lace-print background
Pro Tip: Glue your found object to a small wooden block before inking it. This gives you a proper handle and applies even pressure across the surface, which produces a sharper print.
The sustainable angle is worth noting too. You are using materials that cost nothing, which means you can experiment freely without worrying about wasting supplies.
2. Designing faux vintage postage stamps
There is something about a vintage postage stamp that feels like a small piece of history. Recreating that quality in your own DIY mail art gives your correspondence an extraordinary sense of character.
The key design elements that make a stamp read as “vintage” are:
- Perforated edges. Use decorative scissors with a scallop or pinked edge to cut your printed stamps before applying them.
- Serif typography. Choose fonts modelled on letterpress printing. Tall, condensed typefaces with thin hairlines read as authentically old.
- Engraving-style illustration. Crosshatched or stippled line drawings, printed in a single ink colour, mimic the intaglio printing used in philatelic production for over a century.
- Distress ageing. Apply distress ink around the edges of your finished stamp using a sponge dauber to simulate decades of handling.
- Cancellation marks. Add a hand-stamped cancellation across the corner of your faux stamp using a rubber stamp and a contrasting ink colour.
For materials, you need a rubber stamp set with alphabet and numeral characters, distress inks in sepia and brown tones, and a fine-liner pen for adding details by hand.
Pro Tip: Soak your finished faux stamp in very weak tea for thirty seconds, then dry it flat. This yellows the paper stock uniformly and adds convincing age without any specialist products.
3. Incorporating official commemorative stamps
Official postage stamps are more than postal currency. They are collaborative artwork through artistic dialogue, and incorporating them into mixed-media mail art projects gives your pieces an immediate visual anchor.
The USPS 2026 commemorative collections include a 13-stamp American Icons series and a 5-stamp Bald Eagle Forever series. Both collections offer strong illustrative styles that work as direct reference points for colour palettes and motifs in your surrounding artwork.
| Stamp series | Visual style | Use in mail art |
|---|---|---|
| American Icons (13 stamps) | Bold graphic illustration | Repeat the colour palette in background washes |
| Bald Eagle (5 stamps) | Photographic, naturalistic | Use as focal point, surround with hand lettering |
| Coastal scenes | Watercolour-adjacent tones | Match with watercolour brush lettering |
When using real stamps in mixed-media mail art, place them where they will actually frank the piece. Postal regulations require the stamp to be in the upper right corner and visible to sorting machines. Treat that constraint as a design feature, not a limitation.
4. Adding texture and dimension to stamps
Flat ink on flat paper is only the beginning. Some of the most striking mail art uses stamps as the foundation for three-dimensional detail that the recipient can feel as well as see.
The techniques that work best within postal limits include:
- Embossing powder. Stamp in pigment or embossing ink, pour clear or coloured embossing powder over the wet image, and heat set with a heat gun. The raised, glossy result reads as sophisticated even on a simple design.
- Layering vellum. Print or stamp onto translucent vellum and adhere it over a contrasting background. The layered depth gives an effect that is genuinely hard to achieve with flat media.
- Stitching. Running a needle and thread through the envelope along a stamped line adds tactile interest. Adding stitching or trim boosts texture but must stay within postal size limits to avoid rejection at the sorting office.
For durability, waterproof inks like Stazon are the professional choice for any mail art that will travel through standard post. Water-based inks can smudge badly in humid conditions or when exposed to damp during transit.
When applying creative backgrounds around your address panel, use a piece of scrap paper or a Post-it note as a mask over address blocks, keeping the postal information clean while you apply ink, paint, or stencil work around it.
Pro Tip: Test any textured or embellished piece by placing it in an envelope and weighing it before you post. Royal Mail standard letters have a 5mm thickness limit. Exceeding it automatically moves your item into the large letter category, which carries a higher postage rate.
5. Nature-printed stamps using plants and botanicals
Nature printing is one of the oldest printmaking techniques in existence, and it translates directly into unique postage stamp designs with almost no specialist equipment. You press an inked plant directly onto paper, and the result is an impression that captures every vein and edge of the original specimen.
Gather flat specimens: ferns, herbs like rosemary or sage, pressed flower petals, or thin leaves. Roll a thin, even layer of block printing ink across the plant surface using a small rubber roller. Lay the inked side face-down onto your envelope or stamp panel, cover with a piece of smooth paper, and apply firm, even pressure with your hand.
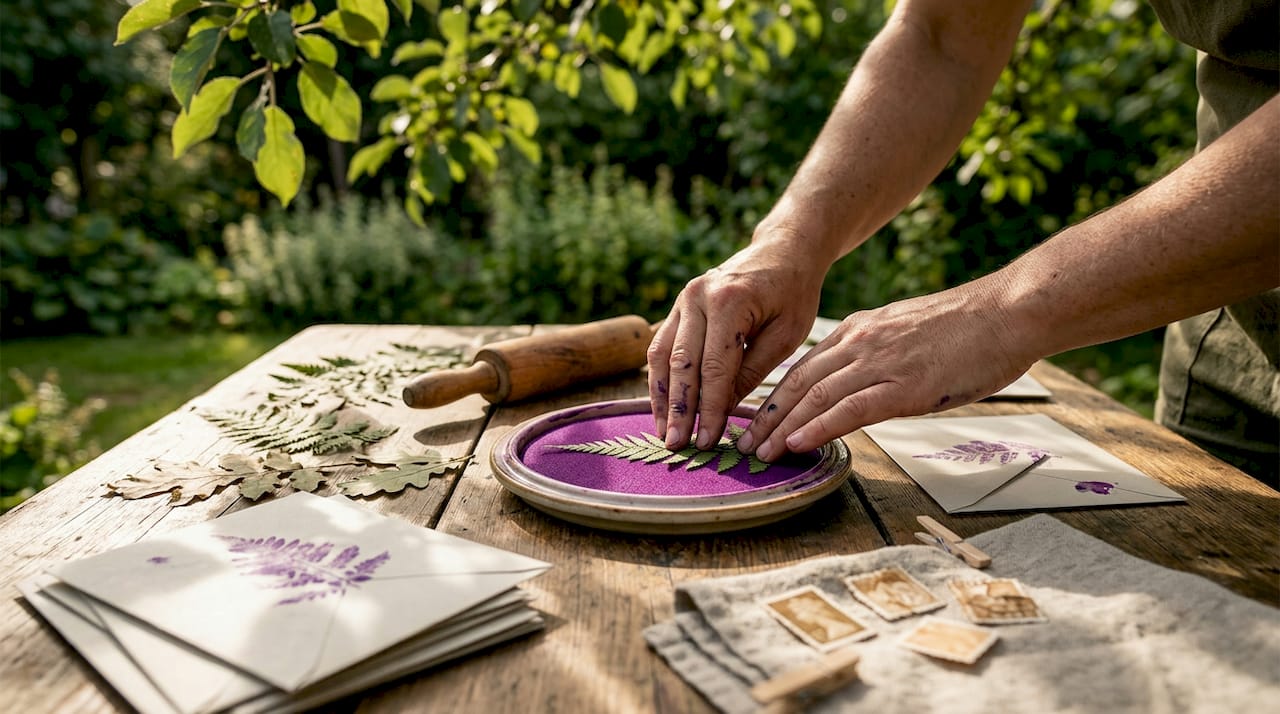
Lift carefully and you have a print that no machine can replicate. The slight irregularities and the botanical accuracy make every impression feel genuinely handmade. Pair this technique with a custom address stamp from Stampdesign4u to give your correspondence a consistent return address without losing the handmade quality of the overall piece.
6. Geometric and abstract pattern stamps from foam sheets
Craft foam sheets, available from most art supply retailers, are one of the simplest materials for stamp making ideas that produce clean, repeatable results. You cut shapes from the foam, adhere them to a wooden block or thick cardboard, and use the assembled surface as your stamp.
What makes foam sheet stamps particularly useful for mail art is the ability to plan a pattern. Cut triangles, diamonds, hexagons, or concentric squares, and arrange them on your block in a deliberate configuration. A well-designed geometric stamp repeated across an envelope at consistent intervals looks considered and intentional, which is a different effect from the happy accidents of found-object printing.
Pair a geometric background stamp with a personalised rubber stamp for your name or a short phrase to give the piece both visual structure and personal identity. The contrast between the geometric pattern and the personal text creates a strong compositional tension.
7. Screen printing simple repeat motifs
Screen printing sounds industrial, but small-format screen printing for mail art is surprisingly accessible. You can create a hand-cut stencil from acetate or freezer paper, tape it to a small mesh screen, and pull ink across the surface with a squeegee or stiff card.
The advantage over rubber stamping is scale. A screen-printed motif can run across the full face of an A5 envelope in one pull, which gives your mail art a boldness that repeated small stamps cannot match. Choose a single, high-contrast motif: a simple bird, a geometric shape, or a bold initial. Keep the design to one or two colours.
8. Wax seal stamps as a finishing technique
Wax seal stamps are not just for wedding invitations. In mail art, a well-placed wax seal adds a three-dimensional element that survives postal transit well, provided you use flexible sealing wax rather than the brittle traditional variety.
The seal itself functions as a stamp in the truest sense: a relief image pressed into a medium that holds the impression permanently. You can use custom metal seal stamps engraved with a monogram, a symbol, or a short phrase. Position the seal on the back closure of the envelope or on the front as a deliberate compositional element rather than hiding it at the back.
Wax is available in a wide range of colours, and mixing two colours in the same pool of wax before pressing creates a natural marbled effect that is different every time.
9. Using stamps in mail art exchanges and postcard swaps
Mail art exchanges are one of the strongest drivers of new ideas because they impose constraints and connect you with other artists simultaneously. Mail art exchanges involve collaborative creation with size and piece limits, with 2026 participants typically creating four 4x6x1/4 inch paper pieces for exchange between papermakers and artists.
The Spring 2026 DIY Postcard Swap asks participants for 10 to 20 original handmade postcards, with AI-generated art excluded. That requirement alone forces you to develop a genuinely personal stamp vocabulary.
- Constraint breeds creativity. When every piece must fit a 4x6 inch format, your stamp design decisions become sharper and more intentional.
- Receiving other artists’ work shows you techniques and material combinations you would not have considered independently.
- Deadlines convert ideas into finished work. A swap with a fixed posting date is more motivating than an open-ended personal project.
- Community feedback on received pieces gives you honest, real-world data on what works visually at postcard scale.
Mail art grows through shared, evolving creative pieces, building community one stamped envelope at a time.
10. Personalised custom rubber stamps for mail art signatures
Every serious mail artist eventually develops a signature visual device. A custom rubber stamp from Stampdesign4u lets you reproduce that device consistently across hundreds of pieces without any variation in quality.
You can design a stamp around your initials, a small illustration, a return address, or a short phrase that functions as your artistic signature. The Trodat Printy range offers self-inking options that produce clean, consistent impressions without a separate ink pad. That consistency matters when you are producing a batch of twenty postcards for a swap and need every piece to carry the same quality of imprint.
Choosing the right rubber stamp for your specific application is covered in detail in this stamp selection guide, which addresses format, impression size, and ink type considerations that apply equally well to hobbyists as to businesses.
My take on mail art stamp creativity
I have been watching how hobbyists approach mail art stamps for a long time, and the single biggest mistake I see is the pursuit of perfection. People hesitate to press an inked leaf onto a good envelope because they are afraid the impression will be uneven. That fear costs them their best work.
The accidental and unpredictable aspects of applying stamps and inks are exactly what makes mail art worth receiving. A slightly misaligned impression, an ink bleed at the edge of a foam stamp, a leaf vein that transferred more clearly on one side than the other: these are not failures. They are the record of a human hand making something real.
My honest view is that the most compelling mail art stamp ideas come from people who are willing to use something slightly wrong. The “wrong” ink on the “wrong” surface, the found object that nobody would think to call a stamp, the commemorative stamp placed off-centre as a compositional choice rather than a postal convention. That willingness to depart from expectation is what separates mail art that gets kept from mail art that gets recycled.
The trend I expect to grow is the combination of precision custom rubber stamps alongside loose, experimental hand-applied textures on the same piece. The contrast is visually striking, and it tells a true story about the maker.
— Steven
Take your mail art further with Stampdesign4u
If you have spent time developing your own mail art stamp ideas, the next step is giving your signature motif a consistent, professional-quality impression that matches the care you put into the rest of the piece.

Stampdesign4u offers a range of customisable rubber stamps suited precisely to this need. The Trodat Printy 4927 is a self-inking stamp with a 60 x 40mm impression area, giving you enough space for a logo, a short phrase, or an illustrated design that functions as your personal mail art mark. For a return address stamp with clean, repeatable results, the Imprint personalised address stamp handles up to five lines of text at a size that sits neatly in the address corner without dominating the composition. Both stamps integrate into a mixed-media mail art practice without requiring any separate ink pad management.
FAQ
What materials work best for DIY mail art stamps?
Foam sheets, rubber carving blocks, and found objects such as bottle caps or leaves all work well for DIY mail art stamps. The best choice depends on whether you need a repeatable, clean impression or a one-off textured effect.
How do I keep mail art stamps from smudging in the post?
Use waterproof, solvent-based inks such as Stazon rather than standard water-based inks. Waterproof inks cure fully on non-porous and semi-porous surfaces and resist moisture during postal transit.
Can I use real postage stamps as part of a mail art design?
Yes. Real stamps must remain in the upper right corner and be visible for postal scanning, but their illustrative style and colour palette can directly inform the surrounding artwork and mixed-media elements.
How do mail art exchanges help with stamp ideas?
Exchanges impose size and format constraints that sharpen your design decisions. Receiving other artists’ pieces also exposes you to techniques and material combinations you would not discover independently.
What is the postal thickness limit for decorated mail?
Royal Mail classifies standard letters at up to 5mm thick. Pieces with stitching, wax seals, or layered embellishments may exceed this and require large letter postage. Weigh and measure before posting.