

The fastest way to get a professional self-inking stamp is to order one from a specialist supplier such as Stamp Design 4U rather than attempting to build one yourself. Choose your size and line count, upload vector artwork, pick an ink colour, and approve a digital proof before production starts. Have your registered business details ready if the stamp needs to match official paperwork.
TL;DR:
- Ordering a custom self-inking stamp from a specialist ensures precise artwork, correct size, and a professional proof that minimizes revisions.
- Water-based dye inks suit most surfaces but perform poorly on glossy or laminated materials, requiring substrate-specific pads for best results.
- Larger stamps with more lines or fine details may need higher-quality dies like photopolymer, as cheaper mechanisms tend to misalign over time.
- Faulty impressions often result from dried-out pads or misaligned dies, and using incompatible inks can cause internal damage or smearing.
- Proper preparation of artwork, including vector files and clear margins, helps maintain clarity and reduces the risk of proof rejection or poor impressions.
Table of Contents
- What is a self-inking stamp and when should you choose one?
- What to prepare before you order: artwork, text and legal details
- Choosing the right specifications: size, lines and ink
- How do you order and approve a custom stamp?
- How do you keep a self-inking stamp working well?
- What drives price, lead time and bulk pricing?
- Can you make a self-inking stamp yourself?
- Why do self-inking stamps stop working properly?
- Is there anything unsafe about handling stamp ink or materials?
- Are self-inking stamps eco-friendly?
- Author perspective: a quick checklist and pitfalls to avoid
- How Stamp Design 4U can help you order the right stamp
- Sources
What is a self-inking stamp and when should you choose one?
A self-inking stamp holds its own ink pad inside the housing. Press it down and a rotating mechanism flips the rubber die onto the pad, then back onto the paper, in one motion. No separate ink pad, no dabbing, no mess.
That mechanism is exactly why offices lean on them for repetitive jobs. Anywhere you need the same clear mark hundreds of times a day, a self-inking design usually wins over a traditional hand stamp:
- High-volume paperwork such as invoice approvals and date stamping
- Packaging and dispatch labelling for online orders
- Returns processing and goods-in checks
- Address stamping on envelopes and parcels
Impression quality comes down to the rubber die and the internal pad. A finer photopolymer die holds crisp detail longer than a coarser rubber compound, and a well-made housing keeps the die aligned so every strike lands square. Cheap mechanisms drift out of alignment after a few thousand impressions; better-built ones don’t.
What to prepare before you order: artwork, text and legal details
Getting your artwork right the first time saves a proof revision cycle, which usually costs you a day or two of waiting.
Pro Tip: Send your logo as a vector file even if you also have a high-resolution PNG. Vector artwork scales cleanly to any stamp size without the edges turning soft or pixelated.
Work through this checklist before you submit anything:
- File format: send AI, EPS or SVG where possible. If you only have a raster image, a high-resolution PNG or TIFF works, though suppliers typically request vector files because they reproduce cleaner edges on the rubber die.
- Text size: keep any line of text no smaller than a legible point size suitable for self-inking stamps. Below that, self-inking impressions tend to blur or fill in, according to font and margin guidance from custom stamp studios.
- Margins: leave 1 to 2 millimetres of clear space inside the edge of the die. Text pushed right to the border tends to smudge on the first few strikes.
- Legal details: if this is a company stamp, the name, registration number and registered address on it should match your official filings, in line with the Companies Act 2006. Mismatched details on a company stamp can cause confusion on contracts and correspondence.
- Order fields: note your preferred ink colour, quantity, and any special instructions before checkout so the design team can raise queries early.
A short checklist like this is the single biggest lever you have over how many proof rounds your order needs.
Choosing the right specifications: size, lines and ink
Size should follow content, not the other way round. A compact 58 × 22 mm stamp suits a five-line address block; a 60 × 40 mm format gives you room for a logo plus a company name, address and contact line without cramming the text. Trying to squeeze nine lines onto a small die is the most common cause of illegible impressions.
Line count and font size are directly linked:
- Small stamps (under 40mm wide): stick to 3 to 5 lines maximum
- Medium stamps (around 60 × 40mm): 6 to 9 lines is workable if the font stays clean and sans-serif
- Larger format stamps: more lines, but legibility still drops once text goes below 6 point
Ink choice matters more than most buyers expect. Self-inking stamps use water-based dye inks by default, which work well on standard paper but struggle on glossy stock, plastic, or laminated surfaces. Mixing ink chemistries, topping up a water-based pad with an oil or solvent ink, can damage the internal mechanism rather than just producing a poor mark. If you’re stamping non-absorbent surfaces regularly, ask for a pad rated for that substrate rather than experimenting with alternative inks yourself.
Pro Tip: If your design includes fine signature-style detail or very thin lines, a pre-inked stamp often reproduces it more sharply than a self-inking die, which relies on pressure through a rubber compound rather than a moulded, ink-saturated surface.
How do you order and approve a custom stamp?
Ordering a professional stamp follows a fairly consistent path across specialist suppliers. Here’s how it plays out from selection to delivery.
- Pick your model and size. A Trodat Printy 4927 at 60 × 40mm suits a nine-line logo and address block, while something closer to the Imprint 13 at 58 × 22mm fits a compact five-line return address.
- Upload your artwork and fill in the order fields. Specify ink colour, quantity, and anything unusual about the layout, such as a reversed element or a logo that needs recolouring.
- Review the digital proof carefully. Check text alignment, that nothing is cut off near the margins, font legibility at actual size, and that any mirrored or reversed elements (rare, but it happens with certain die types) look correct. Most suppliers offer free minor adjustments at this stage, so flag anything that looks off rather than approving reluctantly.
- Wait for production. Once you approve the proof, the die gets engraved and fitted into the housing. Turnaround varies by supplier and order size, and express options are often available if you need a stamp urgently.
- Handle bulk or unusual requests directly. If you need dozens of identical stamps for multiple branches, or a die shape outside the standard rectangular formats, contact support before ordering rather than trying to configure it through a standard product page.
How do you keep a self-inking stamp working well?
A self-inking stamp is mostly maintenance-free, but a few habits keep impressions sharp for years rather than months.
- Wipe the rubber die with a dry or slightly damp cloth if ink builds up unevenly or debris gets trapped in fine detail.
- Avoid solvents or alcohol-based cleaners on the die; they can dry out the rubber compound over time.
- Watch for a fading or patchy impression, that’s usually the first sign the internal pad needs refilling or replacing, not the die itself.
- Refill or swap pads with ink matching the original chemistry. Mixing ink types can damage the stamp’s internal components rather than simply giving a poor strike.
- Most standard pads handle several thousand impressions before needing attention, though heavy daily use in a busy office will wear one out faster than occasional use.
If your stamp starts leaving double impressions or ink smears around the edges, that’s more often a housing alignment issue than a pad problem, worth mentioning to support if cleaning doesn’t fix it.
What drives price, lead time and bulk pricing?
Cost on a custom self-inking stamp mostly comes down to three things: die size, artwork complexity, and quantity.
- Size and lines: larger dies with more text or fine logo detail take longer to prepare and typically cost more than a simple three-line stamp.
- Custom artwork: if your logo needs recreating from a low-resolution file or a scanned image, expect that design work to add to the price.
- Ink and mechanism requests: non-standard ink colours or specialist pads for glossy surfaces sit above the base price.
Standard production and delivery windows are usually measured in a few working days, with express turnaround available for urgent orders at most specialist suppliers. Bulk pricing tends to improve noticeably once you order multiple identical stamps for different staff or branches in one go, so it’s worth consolidating orders rather than reordering one at a time if you know you’ll need several.
Can you make a self-inking stamp yourself?
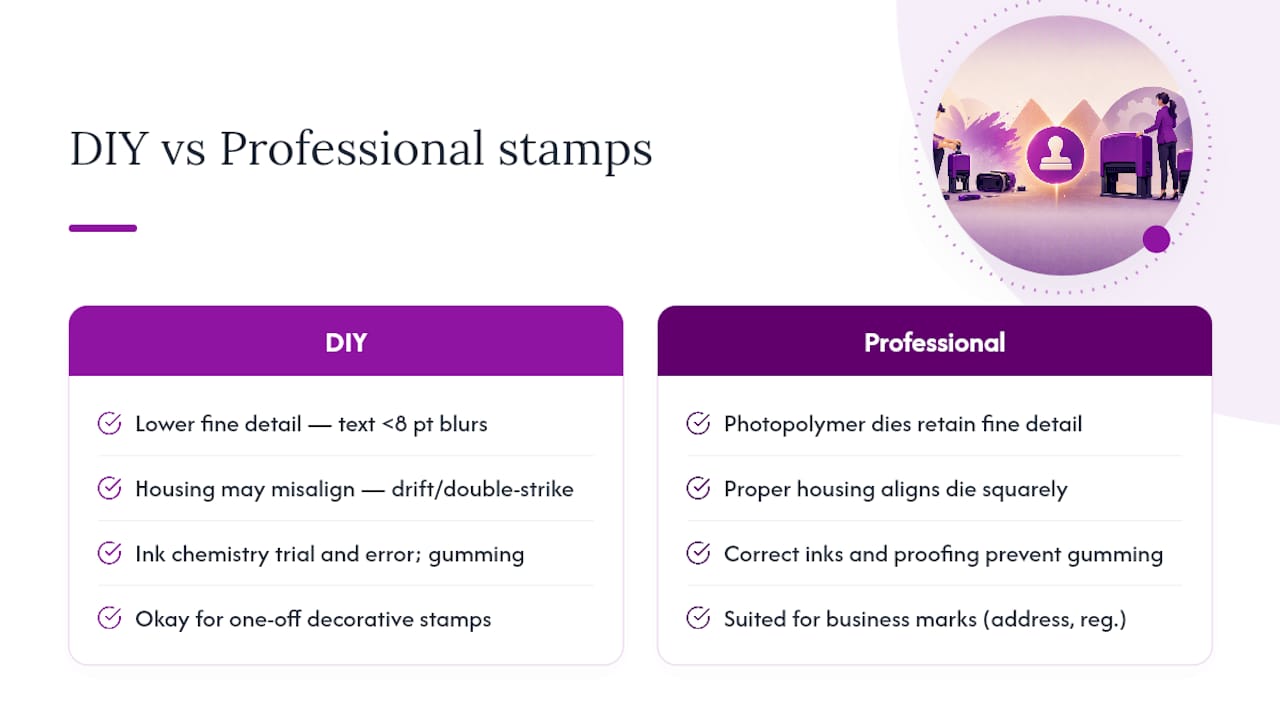
Some hobbyists try building a self-inking stamp at home using a laser-cut or hand-carved rubber die fitted into a repurposed housing, or a kit sold for craft use. It’s a genuine hobby activity, and it can work for one-off novelty stamps where precision doesn’t matter much.
The trade-offs show up quickly once you compare the result to a professionally made stamp. A home-cut die from a craft cutter rarely holds the same fine detail as a photopolymer die produced on commercial equipment, so small text below around 8 point often blurs or fills in. Housings salvaged from old stamps or bought as generic kits don’t always align the die squarely against the pad, which means impressions drift or double-strike after repeated use. Getting the ink chemistry right also takes trial and error. Water-based dye inks behave differently to the pigment inks used in some kits, and using the wrong one can leave a housing gummed up within weeks.
For a single decorative stamp for a craft project, DIY is a reasonable weekend activity. For anything representing a business, a return address, a company name, a registration number, the inconsistency in line quality and alignment makes it a poor substitute for an ordered custom stamp with a proper proof stage built in. A blurred or misaligned mark on an invoice or parcel reflects on the business using it.
Why do self-inking stamps stop working properly?
Most problems trace back to one of three causes: a worn pad, a misaligned die, or the wrong ink.
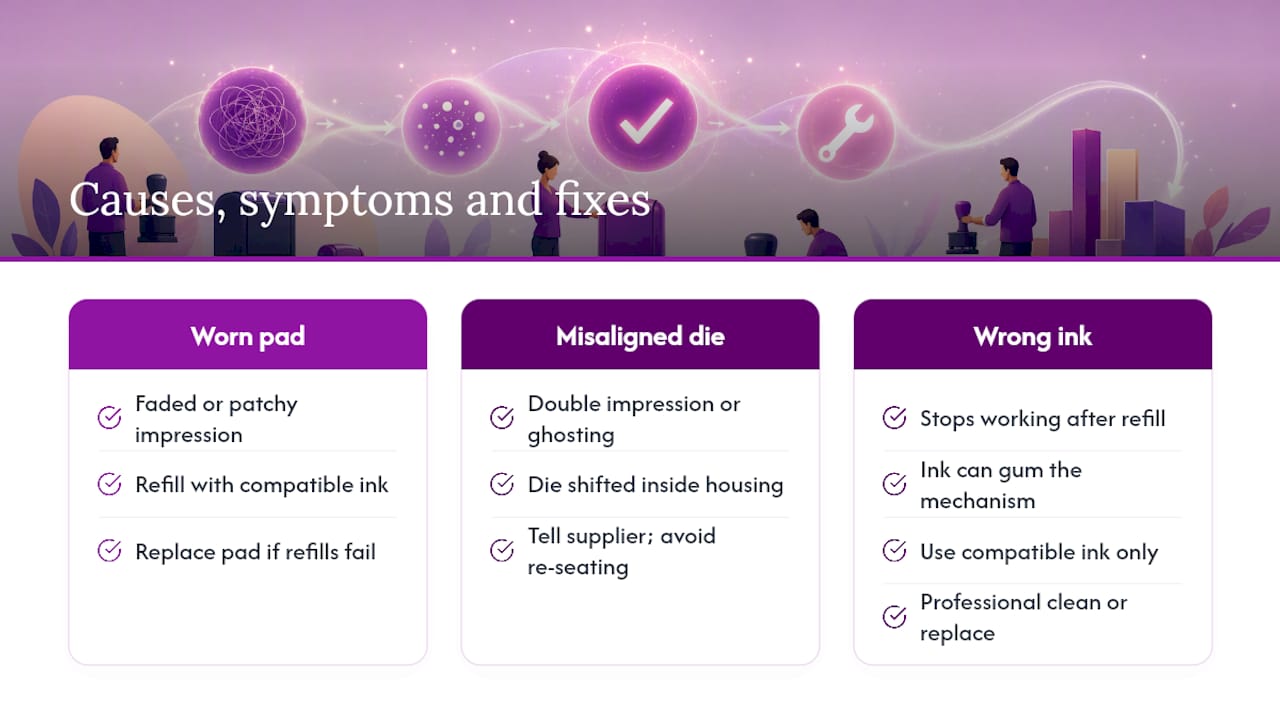
A faded or patchy impression almost always means the pad has dried out or run low. Refilling with a compatible ink usually restores it. If refilling doesn’t help after a couple of applications, the pad itself may need replacing rather than topping up.
A double impression or ghosting points to the die shifting slightly inside the housing, often from years of heavy use loosening the fitting. This is a mechanical wear issue rather than an ink problem, and it’s worth flagging to the supplier rather than trying to re-seat the die yourself.
Ink bleeding or smearing on glossy surfaces happens because standard water-based ink doesn’t absorb into non-porous stock. Switching to a pad specifically rated for plastic or laminated surfaces solves this far more reliably than pressing harder or stamping twice.
A stamp that stops working almost entirely after a refill often means an incompatible ink was used. Mixing chemistries, oil-based ink into a housing designed for water-based dye, for instance, can gum up the internal mechanism. At that point, the housing usually needs professional cleaning or replacing rather than a simple fix.
If a stamp has always struggled with the same line of tiny text, that’s not wear at all, it’s usually a font size that was too small for the die to hold clearly in the first place.
Is there anything unsafe about handling stamp ink or materials?
Stamp inks used in self-inking pads are generally low-risk for everyday office or home use, but a few sensible habits are worth keeping.
Keep ink pads and refill bottles away from young children. Most stamp inks aren’t classed as highly toxic, but they’re not designed for ingestion, and refill bottles often have narrow nozzles that can cause a mess or minor skin staining if handled carelessly.
Ventilate the space if you’re working with solvent-based refill inks for extended periods, they carry a stronger smell than water-based dye inks and prolonged exposure in an unventilated room isn’t pleasant. Wash ink off skin with soap and water rather than solvents; some ink types can irritate skin with repeated contact over time.
If you’re experimenting with home-made stamping materials, craft glue, resin, or improvised rubber compounds, follow the manufacturer’s own safety guidance for those specific materials rather than assuming they behave like commercial stamp components. Ordering a finished, professionally made stamp sidesteps all of this: you’re handling a sealed, tested product rather than raw ink and adhesives.
Are self-inking stamps eco-friendly?
Self-inking stamps have a mixed environmental footprint, mostly tied to plastic housings and the ink itself.
The housing is typically moulded plastic, which lasts for years of regular use but eventually becomes waste once the mechanism wears out. Choosing a well-built stamp with a replaceable pad extends its life considerably, since you’re refilling ink rather than discarding the whole unit every time it runs low. That single habit, refilling instead of replacing, is probably the biggest lever most buyers have over the environmental cost of owning one.
Ink chemistry also varies. Water-based dye inks are generally considered less environmentally harmful than solvent-based alternatives, since they contain fewer volatile organic compounds. If sustainability matters to your organisation, ask your supplier whether water-based, low-VOC ink options are available for your pad type rather than defaulting to whatever’s standard.
Buying one well-specified stamp built to last, rather than a cheap one likely to fail within a year, is itself a modest environmental decision. A die that holds its detail and a housing that stays aligned mean fewer replacement orders over the stamp’s working life.
Author perspective: a quick checklist and pitfalls to avoid
Most proof rejections come from the same handful of mistakes: text set too small, margins ignored, or a logo submitted as a low-resolution screenshot instead of a vector file. Fix those three things before you submit artwork and you’ll likely get a usable proof on the first pass.
My honest view is that people overthink the ink colour and underthink the layout. A stamp with a slightly unusual ink shade still works fine. A stamp with nine lines of eight-point text crammed onto a 40mm die never reads cleanly, no matter the colour. Brief your design contact on what the stamp needs to do, not just what it needs to say, and you’ll get a better result.
— Steven
How Stamp Design 4U can help you order the right stamp
Getting from “I need a stamp” to “I have a stamp that works properly” is largely about avoiding guesswork, and that’s where ordering from a specialist pays off over trying to source or assemble one piecemeal. Stamp Design 4U handles the proof stage, the size and line guidance, and dispatch to customers internationally, so you’re not left checking your own margins or hoping a logo scales cleanly.
If you need a logo and address block together, the Trodat Printy 4927 at 60 × 40mm fits nine lines comfortably. For parcels and dispatch, the personalised packaging stamps collection covers common shipping formats. For a compact return address, the Imprint 13 at 58 × 22mm is a popular fit.
Upload your artwork, choose your ink colour, and request a proof before you commit to production. If you’re unsure which size or line count suits your text, contact support directly rather than guessing at checkout.
Sources
- Companies Act 2006: introduction to the Companies Act 2006
- Which custom ink stamp type is right for your business? – Smartbag
- Custom stamps – PrintX