
TL;DR:
- Collectible stamps must meet museum-grade conditions, requiring precision in design, material selection, and preservation. Modern technologies like laser engraving, Cricut cutting, and 3D printing enhance production accuracy, but strong initial design is crucial for success. Proper storage in acid-free mounts and careful handling maintain the stamp’s collectible value over time.
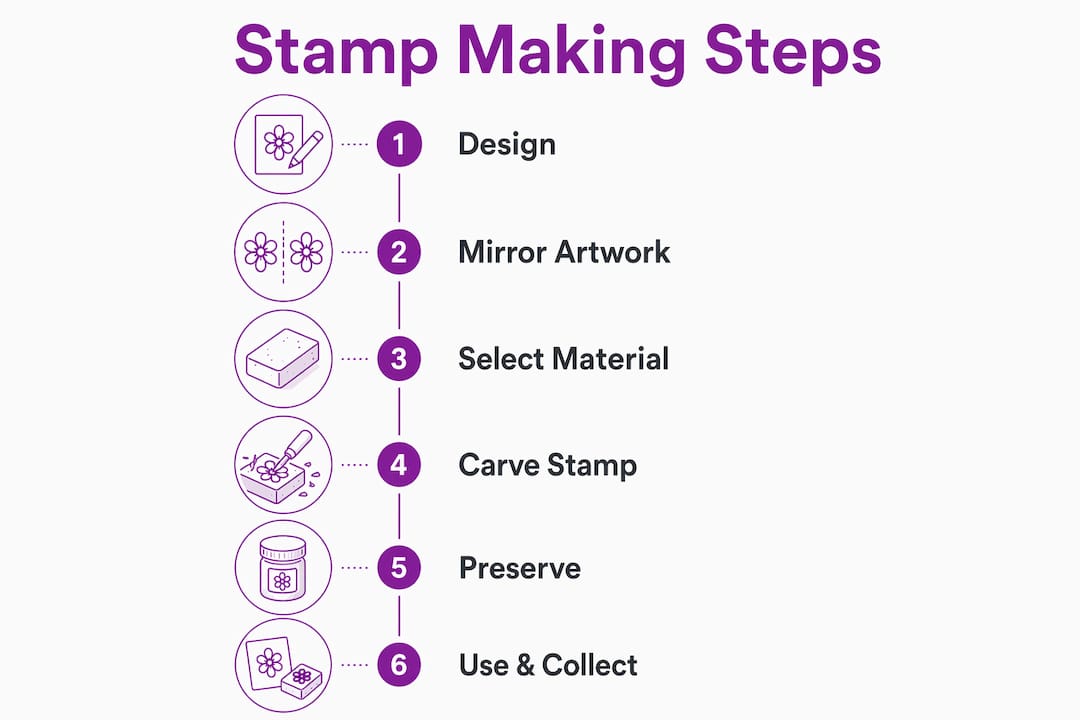
Collectible stamps are defined by perfect centering, vibrant ink, original gum, and zero physical defects. Knowing how to make collectible stamps means understanding that museum-grade condition is the benchmark, not an aspiration. Whether you are hand-carving rubber blocks or using a Cricut machine, the same principles apply: precision in design, quality in materials, and care in preservation. This guide covers every method, from traditional carving to laser engraving and 3D printing, so you can produce stamps that satisfy collector standards for personal enjoyment or resale.
What materials and tools do you need to make collectible stamps?
The right materials separate a functional stamp from a truly collectible one. Material selection is the primary factor defining stamp quality, and different materials demand distinct post-processing techniques to achieve clear, durable impressions.
The three main materials are rubber, foam, and flexible resin. Firm yet flexible rubber suits hand carving and laser engraving. Foam sheets work well with Cricut cutting machines for lighter craft applications. Flexible resin, such as that produced by Formlabs, is preferred for 3D printing because it mimics the impression quality of traditional rubber.
Design software is equally important. Adobe Illustrator and Inkscape both produce vector files in AI, SVG, and EPS formats. Vector formats prevent quality loss when scaling designs. Digital stamp designs require a minimum of 300 DPI resolution, with 600 DPI preferred for high-quality results. Many providers charge £8–16 to convert raster files, so preparing your artwork correctly from the start saves both time and money.
| Method | Primary Material | Key Tool | Skill Level |
|---|---|---|---|
| Hand carving | Firm rubber block | Carving set | Beginner to intermediate |
| Laser engraving | Laserable rubber sheet | Laser engraver | Intermediate |
| Cricut cutting | Foam or rubber sheet | Cricut machine + Design Space | Beginner |
| 3D printing | Flexible resin | 3D printer | Advanced |
Always mirror your artwork before production. Every method requires a reversed image so the final impression reads correctly. Preparing stamp images correctly before production is a step many beginners skip, and it is the most common cause of wasted materials.
Pro Tip: Convert all fonts to outlines in Adobe Illustrator or Inkscape before submitting your file. This prevents font substitution errors and keeps your design exactly as intended.
How do you hand-carve a collectible stamp step by step?
Hand carving is the most traditional stamp making technique and the one that produces the most personal results. Successful hand-carved stamps depend on composition and typography balance before the carving even begins. Getting the design right on paper is more important than carving skill alone.
Follow these steps for a clean, collectible result:
- Choose your rubber block. Select a firm yet flexible rubber block. Avoid overly soft materials, which compress unevenly under pressure.
- Transfer your design. Print your mirrored design, then use tracing paper or carbon paper to transfer it onto the rubber surface. Press firmly and evenly.
- Begin carving. Use a V-shaped gouge for fine lines and a U-shaped gouge for clearing larger areas. Keep strokes controlled and move away from the body.
- Maintain correct depth. Carve to a depth of 0.5–1mm for the relief areas. Shallower cuts produce faint impressions; deeper cuts risk tearing fine details.
- Clean the die. Remove rubber debris with a soft brush, then rinse gently with mild detergent and water. Dry thoroughly before proofing.
- Proof the impression. Press the stamp onto scrap paper using even pressure. Check for uneven inking, collapsed lines, or off-centre results.
- Make adjustments. Return to the block and refine any areas that appear muddy or unclear. Repeat the proofing process until the impression is crisp.
- Store correctly. Wrap the finished stamp in acid-free tissue and store flat, away from direct sunlight and heat sources.
The two most common beginner mistakes are applying too much pressure during carving, which tears fine details, and carving lines thinner than 1pt, which collapse entirely during inking. Patience is the single most valuable skill in hand carving. Expect your first few attempts to require significant adjustment before reaching a collectible standard.
Pro Tip: Practise your carving strokes on a spare rubber block before working on your final design. Even 30 minutes of practice dramatically improves control and reduces wasted material.
How does technology like laser engraving and cricut compare for stamp making?
Modern technology produces stamps with a level of precision that hand carving cannot reliably replicate at scale. Each method has distinct strengths depending on your budget, design complexity, and production volume.
Laser engraving offers the highest precision of the three technology methods. The process requires a laser engraver, laserable rubber sheets, and design software. Engraving depth of 0.5–1mm and use of the ramp feature on laser engraving machines improves durability and prevents bending during stamp use. After engraving, clean the die with detergent and attach it to a mount using adhesive such as 3M tape. Laser engraving handles intricate designs, fine text, and repeating patterns with consistent results across every unit.

Cricut machines are the most accessible entry point for hobbyists. Using a Cricut machine involves foam or rubber sheets, Design Space software, and a cutting blade. Beginners typically complete their first stamp assembly in 30–60 minutes. The process suits detailed shapes and quick production runs, though very fine lines are harder to achieve than with laser engraving.
3D printing with flexible resin is the most advanced option. Flexible resin stamps mimic traditional rubber impressions and offer durability and design customisation. Artwork must be mirrored before printing, and post-processing involves washing and curing the resin before use. Formlabs flexible resins are a recognised choice for lasting results.
| Method | Precision | Setup Cost | Best For |
|---|---|---|---|
| Laser engraving | Very high | High | Complex, repeatable designs |
| Cricut cutting | Medium | Medium | Quick craft projects |
| 3D printing | High | High | Durable, custom shapes |
- Laser engraving suits collectors wanting professional-grade consistency across multiple stamps.
- Cricut machines work well for hobbyists producing small runs of themed or decorative stamps.
- 3D printing is ideal for experimental designs or unusual shapes not achievable by cutting.
How do you design stamps that appeal to collectors?
Design is where collectible stamps are won or lost before production even starts. Initial stamp design composition, balancing typography and imagery, is more critical to carving success than technique alone. A poorly composed design cannot be rescued by skilled carving or precise engraving.
Key design principles for collector-grade stamps:
- Use vector graphics throughout. Adobe Illustrator and Inkscape both produce scalable files that retain clarity at any size. Outline all fonts and expand all strokes before exporting.
- Avoid fine lines below 1pt. Fine lines below 1pt collapse or tear during production. Increase line weight and simplify intricate areas to maintain imprint fidelity.
- Incorporate thematic or historic elements. Collectors respond to stamps that reference real postal history, geographic motifs, or period typography. These details increase perceived value and collector interest.
- Introduce deliberate colour variation. Collectors prize production varieties. Layering ink colours or introducing subtle shifts mimics the rare printing errors that make historic stamps valuable.
- Proof before committing. Always test stamp on scrap paper before producing a full run. Adjust ink coverage, pressure, and alignment until the impression is centred and clean.
For further guidance on artistic composition, the stamp design principles covered by Stampdesign4u provide practical direction on balancing visual elements for both craft and collector markets.
How do you preserve handmade stamps to maintain collectible value?
Preservation determines whether a handmade stamp retains its collectible condition over time. Museum-quality stamps require storage in acid-free, non-PVC mounts, with humidity maintained between 40–50% and temperature held stable around 18–22°C. These conditions prevent deterioration of both the rubber and any paper or card components.
Practical preservation steps:
- Handle with philatelic tongs. Finger oils and dirt transfer directly to rubber and paper surfaces, degrading impression quality and surface condition.
- Store in acid-free mounts. PVC-based albums off-gas chemicals that degrade rubber and cause discolouration over time. Use polyester or polypropylene sleeves instead.
- Control the environment. Avoid storing stamps near windows, radiators, or in rooms with fluctuating temperatures. A stable, cool, and dry environment extends stamp life significantly.
- Keep carving tools clean. Residual ink on carving tools transfers to future projects. Clean blades and gouges with isopropyl alcohol after each session.
- Grade your stamps honestly. Collectors use recognised grading scales to assess condition. Overstating condition damages your reputation in trading and resale markets.
Pro Tip: Store rubber stamp blocks flat rather than upright. Storing them on their sides causes the rubber to warp over time, which distorts the impression surface.
Key takeaways
Producing collectible stamps requires precise design preparation, correct material selection, and consistent preservation practices to meet collector standards.
| Point | Details |
|---|---|
| Design preparation is primary | Mirror artwork, use vector files at 600 DPI, and outline all fonts before production. |
| Material choice defines quality | Firm rubber suits carving; flexible resin suits 3D printing for durable, precise impressions. |
| Technology improves consistency | Laser engraving at 0.5–1mm depth produces repeatable, professional-grade results. |
| Preservation maintains value | Store in acid-free mounts at 40–50% humidity and 18–22°C to prevent deterioration. |
| Design composition comes first | Balancing typography and imagery before carving determines the quality of the final impression. |
Why beginners underestimate the design stage
Most beginners focus on carving technique or equipment choice and treat design as a secondary concern. That is the wrong order of priority. After working with stamp making for years, the pattern is consistent: the stamps that fail at the proofing stage almost always have a design problem, not a carving problem. Lines that are too fine, fonts that were never outlined, or compositions that are too dense for the stamp size. These issues cannot be fixed with a sharper gouge or a better laser setting.
The emerging role of technology is genuinely positive for hobbyists. Cricut machines and laser engravers have made precision accessible without years of carving practice. But technology amplifies design errors just as efficiently as it amplifies good design. A poorly composed file fed into a laser engraver produces a precisely engraved poor design.
The niche market for handmade collectible stamps is real and growing. Collectors value originality, and a well-documented handmade stamp with a clear production story commands attention. The mistake most hobbyists make when considering resale is underpricing their work because they compare it to mass-produced stamps. A hand-carved stamp with a compelling design and documented provenance occupies a different category entirely. Explore the types of rubber stamps available to understand where handmade work sits within the broader market before setting prices.
— Steven
Start making your own collectible stamps with Stampdesign4u

Stampdesign4u stocks a range of products suited to hobbyists and collectors at every stage. The Trodat 4927 logo and text stamp handles up to nine lines of text and logo artwork at 60 x 40mm, making it a practical choice for collectors designing themed or commemorative stamps. For smaller craft applications, the Traxx 9021 loyalty stamp at 14 x 14mm suits compact decorative designs and repeat-pattern projects. Both products are available through the Stampdesign4u online shop, alongside starter kits and supplies for beginners working through their first designs. Visit Stampdesign4u to browse the full range.
FAQ
What resolution do digital stamp designs need?
Digital stamp designs require a minimum of 300 DPI, with 600 DPI preferred for high-quality collectible results. Vector formats such as SVG, AI, and EPS are recommended to prevent quality loss at any scale.
What is the correct engraving depth for laser-engraved stamps?
The correct engraving depth is 0.5–1mm. This range produces durable impressions and prevents the rubber from bending during repeated use.
How long does it take a beginner to make a stamp with a cricut machine?
Beginners typically complete their first Cricut stamp assembly in 30–60 minutes, including cutting and mounting. The process suits detailed shapes and is one of the most accessible entry points for new hobbyists.
What storage conditions preserve collectible stamps best?
Collectible stamps should be stored in acid-free, non-PVC mounts at 40–50% relative humidity and a stable temperature of 18–22°C. Avoid direct sunlight and rooms with fluctuating conditions.
Do handmade stamps have resale value?
Handmade stamps with strong design composition, documented provenance, and collector-grade condition do hold resale value in niche philatelic and craft markets. Unique production characteristics, such as deliberate colour variation, increase collector interest further.