
TL;DR:
- Stamp design may seem difficult but becomes accessible with the right materials and techniques. Beginners should start with soft rubber blocks, keep designs simple, and practice proper carving and inking methods for best results. Focusing on enjoyment and mindful carving produces character-filled stamps and enhances the creative experience.
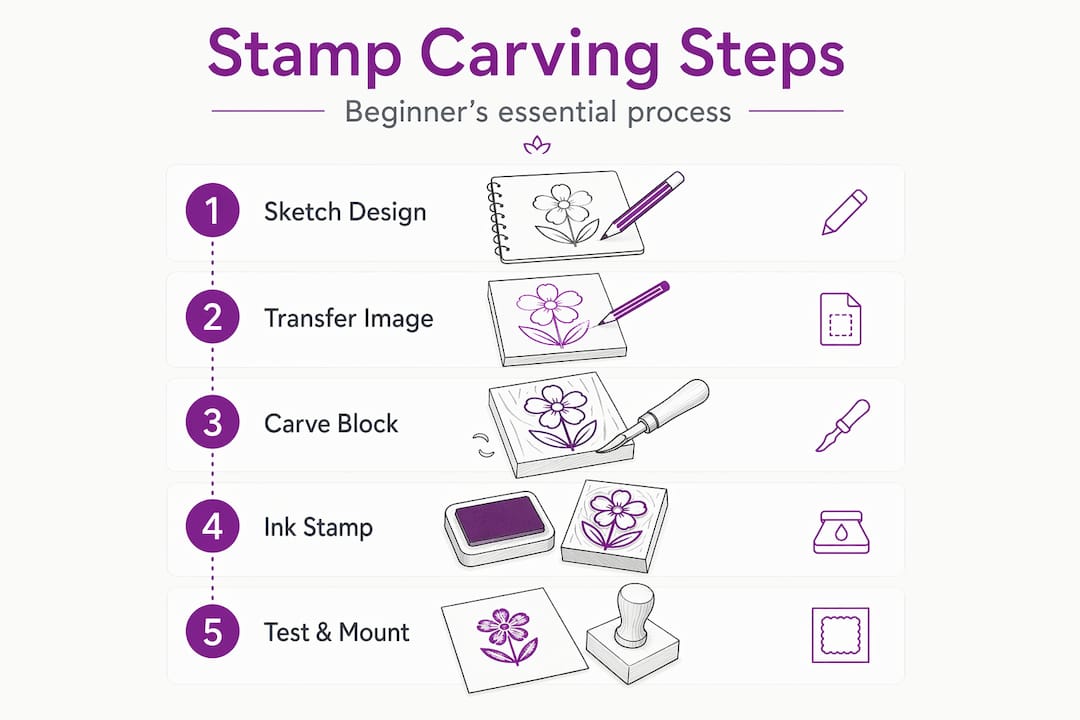
Stamp design is one of those crafts that looks tricky from the outside but opens up quickly once you have the right information. This beginner’s guide to stamp design covers everything you need to get started: which materials to buy, how to plan and transfer your design, how to carve safely and accurately, and how to get a clean impression every time. Whether you want to personalise your stationery, create handmade gift tags, or simply try something new, you will find the process more accessible than you expect.
Table of Contents
- Key takeaways
- Essential tools and materials for stamp design
- Planning and transferring your design
- Step-by-step carving techniques
- Inking, testing, and mounting your stamp
- Common mistakes and creative inspiration
- My honest take after years of carving
- Get started with Stampdesign4u
- FAQ
Key takeaways
| Point | Details |
|---|---|
| Start with soft rubber | Soft rubber carving blocks are forgiving and ideal for first-time carvers learning basic techniques. |
| Keep designs simple | Bold lines and minimal detail transfer more clearly to a stamp than intricate artwork. |
| Mirror text before carving | Any lettering must be reversed on the block so it reads correctly once stamped. |
| Test as you carve | Pressing a test impression on scrap paper during carving helps catch errors before they become permanent. |
| Master pressure, not products | Even, consistent pressure when inking and stamping produces clearer results than owning many tools. |
Essential tools and materials for stamp design
Getting your kit right from the start saves a lot of frustration. According to 2025 DIY craft guides, beginners should start with soft rubber carving blocks and basic tools like a precision knife and V-shaped gouges, as these materials are forgiving and require minimal investment compared to professional laser-engraved or photopolymer setups.
Here is a clear overview of what you need and what each item does:
| Tool or material | Purpose |
|---|---|
| Soft rubber carving block | The surface you carve your design into |
| Precision knife or craft blade | Outlining the design and fine detail work |
| V-shaped gouge | Removing narrow lines of rubber cleanly |
| U-shaped gouge | Clearing larger areas of negative space |
| Ink pad (black recommended) | Applying ink evenly to your finished stamp |
| Cutting mat | Protecting your work surface during carving |
| Pencil board or firm pad | Providing a stable surface when taking impressions |
| Cleaning cloth or stamp cleaner | Maintaining your stamp between uses |
You do not need to buy every item separately. Many craft shops and online retailers sell starter kits that bundle these tools together. The quality of a kit tool is usually sufficient for a beginner and avoids the guesswork of matching items individually.
A few words on safety. Always cut away from your hands, never towards them. Hold the carving block steady with your non-dominant hand positioned well clear of the blade path. Cutting techniques such as holding blades at less than 45 degrees and carving away from your body significantly improve control and reduce the risk of slipping. If you are new to craft knives, wearing a cut-resistant glove on your non-dominant hand is a sensible precaution.
Pro Tip: Buy a beginner carving kit that includes at least one V-gouge, one U-gouge, and a precision knife. A kit removes the guesswork from tool selection and gives you a matched set that works well together from day one.
For more detail on selecting the right rubber and related materials, the stamp materials guide from Stampdesign4u covers quality and durability considerations worth reading before you buy.
Planning and transferring your design
This stage is where most beginners either set themselves up for success or unknowingly create problems they will struggle to fix later. The single most useful piece of stamp design advice for beginners is this: keep it simple.
Simple, bold designs with clean lines are best for beginners, because fine details tend to either break off during carving or disappear under ink. Thin lines, crosshatching, and photorealistic shading are techniques for experienced carvers. A leaf outline, a geometric shape, a bold initial, or a simple flower silhouette will all stamp beautifully.
When planning your design, keep these points in mind:
- Size matters. A design that fits comfortably within a 5 x 5 cm square is manageable for a first attempt. Larger designs require more carving time and more control to keep even.
- Reverse any text. If your design includes letters or words, you must mirror the image horizontally before transferring it. Text carved as you would normally write it will print backwards.
- Avoid closed loops in fine detail. Small enclosed areas, such as the inside of the letter ‘e’ or tiny circles, are difficult to carve and tend to fill with ink.
- Bold outlines work best. Think of your design as a simple woodcut or linocut print rather than a drawing.
To transfer your design onto the rubber block, you have three reliable methods. A pencil sketch can be pressed face-down onto the block and rubbed firmly to transfer graphite. Tracing paper works in a similar way. A heat transfer using a printed design and an iron is the most accurate method but requires a laser-printed image rather than an inkjet print.
Pro Tip: Practise carving on a scrap piece of rubber before committing to your final block. Even five minutes of practice scooping and outlining will give you a much better feel for how much pressure the material needs.
Step-by-step carving techniques
Carving a stamp is satisfying work when you approach it methodically. Rush it, and small errors compound quickly. Take it steadily, and each pass of the tool reveals a cleaner design. Here is a reliable process to follow:
- Outline your design first. Use a precision knife or small V-gouge to cut along the edges of your design. This defines the boundary and prevents rubber from tearing into areas you want to keep.
- Remove negative space in stages. Work from the outline outward, using a U-gouge to clear the rubber you do not want. Do not try to remove everything in one deep pass.
- Use small, controlled scoops rather than long cuts. Experienced crafters note that beginners who rush often push the gouge too far, causing the tool to skip or tear. Short, deliberate movements give you far more control.
- Rotate the block, not your hand. When carving curved sections, turn the rubber block in your non-dominant hand rather than twisting your wrist. This keeps your cutting angle consistent.
- Test your stamp regularly. Press the partially carved stamp onto an ink pad and take a test impression on scrap paper. Frequent test impressions help you identify areas that need more rubber removed and prevent you from over-carving sections that are already working well.
- Clean between tests. Brush away rubber shavings with a soft brush before taking each test impression so debris does not transfer to your paper.
Slowing down and treating carving as a deliberate, mindful process leads to better results and safer practice. The crafters who produce the cleanest stamps are rarely the fastest ones.
Pro Tip: If you carve too deeply into an area you wanted to keep, carving errors can be repaired by patching with a small piece of spare rubber and strong glue. It is not perfect, but it can save a design you have put hours into.
Inking, testing, and mounting your stamp
Once carving is complete, the way you apply ink and take impressions makes a significant difference to the quality of your results.
Stamping experts recommend mastering technique over buying many tools, with a focus on even, straight-down pressure. A black ink pad is the best starting choice. Black shows up cleanly on most paper types, dries quickly, and makes it easy to see exactly how well your design is transferring.
Follow these steps for the best impressions:
- Press your stamp gently but firmly onto the ink pad rather than rubbing it back and forth. Rubbing applies uneven ink and can deposit too much on the raised surface.
- Place your paper on a stable, flat surface. A pencil board or firm magazine works well. Printing on a soft surface causes partial or blurry edges.
- Press the stamp straight down without rocking it from side to side, then lift cleanly upward.
- If you see blank spots in the impression, the rubber in that area is either sitting too low or needs more ink. Re-ink and try again.
- If the edges are smudging, you are likely applying too much ink or pressing down at a slight angle.
Once you are happy with your stamp design, mounting it makes it far easier to use consistently. Gluing carved rubber to a wooden block or a cork provides a firm grip, improves control, and gives the stamp a professional feel. Cut a piece of wood slightly larger than your stamp, sand it smooth, and use strong craft glue to attach the rubber. Allow it to dry fully before use.
Cleaning after every session extends the life of your stamp considerably. Use a damp cloth or a dedicated stamp cleaner. Avoid soaking the rubber, as prolonged water exposure can cause some materials to swell or warp over time.
Common mistakes and creative inspiration
Knowing what goes wrong for most beginners saves you time and wasted materials. These are the pitfalls that come up most often, and how to handle them:
- Rushing the carving process. The single most common error. Slow, deliberate carving is always faster in the long run because it avoids the need to start over.
- Using blunt blades. A dull blade tears rubber rather than cutting it cleanly. Replace blades regularly, especially if you notice the tool dragging.
- Too much ink on the pad. Press the stamp onto the pad two or three times rather than sitting it heavily in a pool of ink. Over-inking fills in fine details.
- Carving too deeply too quickly. Remove rubber in thin layers. You can always carve more, but you cannot put rubber back.
- Skipping the test impression. Even when things feel like they are going well, testing your stamp frequently during carving is the most reliable way to catch problems early.
Once you have carved your first few stamps, the creative possibilities expand quickly. Personalised stationery is an obvious starting point. Gift tags, book plates, fabric printing on plain cotton tote bags, and wax seal-style paper borders are all achievable with simple hand-carved stamps. Many hobbyists build up a small collection of seasonal motifs. Others develop a recognisable personal style that turns up across everything they make. For design ideas beyond the basics, the artistic stamp design guide from Stampdesign4u offers creative direction for when you are ready to push your skills further.
My honest take after years of carving
I want to share something that most beginner tutorials skip over. When I first started carving stamps, I was far too focused on the final result and not nearly attentive enough to the process itself. I kept comparing my early stamps to polished examples I found online, and that comparison was not helpful.
What changed things for me was accepting that a small mistake in carving is rarely a disaster. In fact, some of my favourite stamps have a slight wobble in the line or an unexpected gap that gives them character you simply cannot get from a machine-made stamp. The irregularity is the point.
I have also found that carving slowly has a quality to it that is genuinely hard to describe until you experience it. There is something meditative about making small, deliberate cuts and watching a design emerge from a flat block of rubber. It is not a race. The zen quality of carving mindfully is something experienced crafters mention frequently, and I think it is one of the real rewards of the hobby that no one talks about enough.
My practical advice is this: focus on enjoyment first and quality second. The quality will follow naturally as your hands learn what the tools can do. Give yourself permission to make ten imperfect stamps before you expect a perfect one.
— Steven
Get started with Stampdesign4u
If you have worked through this guide and want a professional, ready-to-use result alongside your DIY carving practice, Stampdesign4u has a strong range of custom stamp options suited to beginners and small businesses alike.

The Trodat Printy 4927 is a popular starting point: a 60 x 40mm rubber stamp that accommodates up to nine lines of text or a logo, and arrives ready to use without any carving required. For something more compact and creative, the Traxx 9021 loyalty stamp is a neat 14 x 14mm option well suited to craft projects and personalised branding. Stampdesign4u offers personalised stamp design services across its full product range, so whether you are looking for a logo stamp, a text stamp, or a completely custom design, the site gives you a straightforward path from idea to finished product.
FAQ
What materials do beginners need to start stamp carving?
Beginners need a soft rubber carving block, a precision knife, at least one V-gouge and one U-gouge, a black ink pad, and a cutting mat. Starter kits that bundle these items together are widely available and offer good value.
How do you transfer a design onto a rubber carving block?
The three main methods are pencil sketch transfer (pressing a pencil-drawn design face-down onto the rubber), tracing paper, and heat transfer using a laser-printed image. Heat transfer is the most accurate but requires a laser printer rather than an inkjet.
Why does my stamp leave smudgy or uneven impressions?
Smudging is usually caused by too much ink, an uneven surface beneath the paper, or rocking the stamp slightly when pressing down. Use a firm flat surface under your paper, apply ink sparingly, and press straight down and lift cleanly upward.
How do I fix a carving mistake on a rubber stamp?
Small mistakes can be repaired by filling the affected area with a piece of scrap rubber and strong adhesive. Sharp tools and slow carving prevent most errors before they happen.
Can beginners carve stamps with text on them?
Yes, but the text must be mirrored horizontally before you transfer it to the block. Text carved in its normal reading orientation will print in reverse. Many free image editors allow you to flip text horizontally before printing or tracing.