

For most small businesses, a self-inking rectangular address stamp is the best choice for outgoing mail. It stamps faster than a traditional pad-and-die combination, gives repeatable impressions across dozens of envelopes without re-inking, and refills easily when the pad runs dry. Add a small logo or loyalty stamp only if your branding needs it. You can often request a proof of your stamp design before committing to a bulk order.
TL;DR:
- Self-inking stamps handle hundreds of impressions per refill and are ideal for high-volume daily mailing, with refills being straightforward.
- Pre-inked stamps produce sharper images on smooth surfaces but have smaller ink reservoirs and less effectiveness on textured or fibrous paper.
- Rectangular plates around 60 by 40 millimeters are best for multi-line addresses, while smaller round stamps suit initials or loyalty marks.
- Pigment or oil-based inks work better on kraft and coated surfaces, resisting smudging and bleeding, unlike dye-based inks that dry quickly on smooth paper.
- Testing proofs on actual paper stock before bulk order prevents layout issues and ensures a professional, legible, and balanced imprint.
Table of Contents
- How do I choose the right stamp type for my mail volume?
- What should you actually put on a business mail stamp?
- What size and shape works best for envelopes and parcels?
- Which ink works on which mailing surface?
- How do you stamp mail neatly and get repeatable results?
- How do you keep a stamp performing well over time?
- Getting the details right on real mail stock
- Where to buy the right stamp for your business mail
- Sources
- FAQ
How do I choose the right stamp type for my mail volume?
The stamp market splits into three main types, and each suits a different mailing pattern. UK businesses commonly choose among self-inking, pre-inked, and traditional rubber stamps with a separate pad, and the right pick depends less on preference and more on how much post you actually send.
Self-inking stamps hold their own ink pad inside a spring mechanism, so one stamp handles hundreds of envelopes before it needs a refill. They’re the workhorse for daily outgoing mail: fast, refillable, and forgiving if you press slightly off-centre.
Pre-inked stamps store oil-based ink directly in the die itself, producing sharper, fine-line impressions than self-inking versions. They’re excellent for crisp logos on smooth paper, but the trade-off is a smaller ink reservoir and less tolerance for textured or fibrous surfaces like kraft.
Traditional rubber stamps with a separate pad remain useful for occasional mailers or oversized plates that won’t fit a self-inking cartridge. They also cope better with odd or curved surfaces, such as the seam of a padded envelope.
Before ordering, run through this quick checklist:
- How many items do you stamp per week, roughly?
- What surfaces will you stamp: smooth paper, kraft, coated stock, or a mix?
- Do you need fine detail, or just a clear, bold impression?
- Will one person stamp everything, or will several staff share the stamp?
Match the answers to the type above and you’ll avoid buying a stamp that fights your workflow from day one.
What should you actually put on a business mail stamp?
Keep it simple. A professional stamp should prioritise a clear company name and a readable return address over anything else, and that priority should shape the whole layout.
The essentials:
- Business name as the largest, most prominent line.
- Return address, ideally shortened to fit three or four lines.
- Phone number or email, only if there’s genuine room without crowding the design.
- Logo, kept small and simple. Intricate line work fills in with ink over time and turns to a smudge on cheaper paper.
Leave off registration numbers, VAT details, or other legal identifiers. Those belong on invoices and letterheads, not on a stamp whose job is to get a parcel home if it’s undeliverable.
Design guidance from stamp specialists backs this up: clear sans-serif or block fonts, with no more than three or four lines, read far more reliably than script fonts or dense logos at small sizes. Ordering the lines by importance, name first, address second, matters just as much as the font choice.
Pro Tip: Write a short “mailing variant” of your address before you order. Drop the second address line, abbreviate the county, and test whether the whole thing still fits in four lines. A mailing-specific version of your details is almost always more legible than your full letterhead address squeezed onto a small plate.
What size and shape works best for envelopes and parcels?
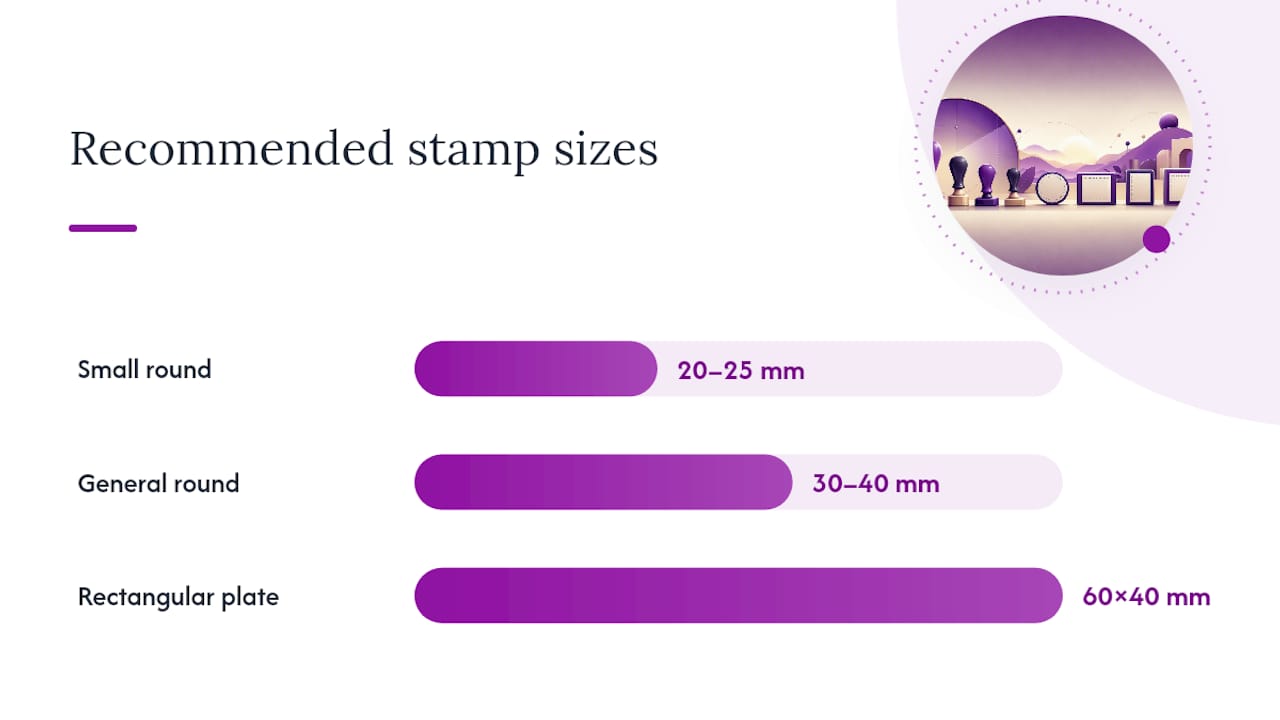
A few layout rules to work from:
- Rectangular plates suit addresses and multi-line text; the horizontal space accommodates a name, street, and postcode without cramming.
- Round plates suit seals, badges, or a single short line, such as “Handmade in [town]”.
- Two stamps beat one overloaded plate. A dedicated address stamp plus a small logo or loyalty stamp often stamps faster and reads more clearly than one plate trying to do both jobs.
- Parcels and boxes can take a larger format again, particularly for packaging stamps designed for kraft surfaces.
Before committing to a production run, print a paper proof at actual size and hold it against a real envelope. Then stamp a handful of test envelopes and kraft parcels. A design that looks balanced on a screen can crowd the corner of an envelope or bleed off the edge of a padded mailer once it meets real ink and real card stock.
Which ink works on which mailing surface?
Ink choice causes more disappointment than any other decision in this guide, mostly because people assume all stamp ink behaves the same on all paper. It doesn’t.
Pigment and oil-based inks sit on top of the surface rather than soaking in, which makes them resistant to smudging and to distortion when a parcel gets photocopied or scanned in transit. They’re the better performer on kraft and coated materials, which describes most parcel packaging and a fair share of premium stationery.
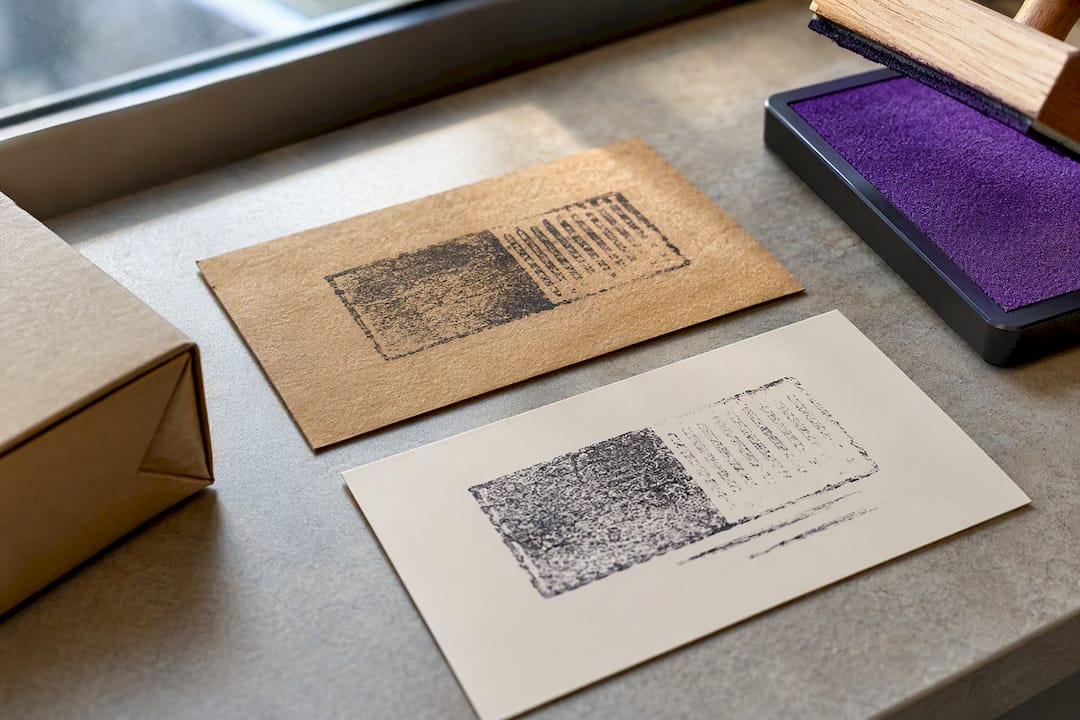
Dye-based inks dry quickly and look bright on smooth office paper, but they soak into porous stock. On kraft or recycled envelopes, that same absorbency turns a clean rectangle into a fuzzy, bled-out shape within seconds.
A rough guide to matching ink and surface:
| Surface | Recommended ink | Why |
|---|---|---|
| Smooth white envelopes | Dye-based | Dries fast, sharp edges |
| Coated or glossy stock | Pigment | Resists smudging and fading |
| Kraft parcels and boxes | Oil-based or pigment | Won’t bleed into rough fibres |
| Photocopied or scanned mail | Pigment | Holds definition under reproduction |
Never mix ink formulations when refilling a pad. Manufacturers warn that combining incompatible inks can damage the rubber die or the pad mechanism itself, so stick to the ink type your stamp was designed for and check the manufacturer’s compatibility notes before you top up.
How do you stamp mail neatly and get repeatable results?
Consistency comes from preparation, not from pressing harder. Follow these steps for every batch:
- Set up your workstation. Pick one corner of the envelope or one face of the parcel as your fixed stamping point, wipe away any dust, and lay out a simple paper guide if you’re stamping a large batch.
- Test the ink first. Stamp once on scrap paper to check coverage before touching the real envelope.
- Align and press. Line the plate up against your guide, then press down with firm, even pressure. Rocking the stamp side to side is what causes smeared edges.
- Inspect every tenth item or so. Check for fading, and re-ink the pad as soon as the impression starts to look patchy rather than pushing on until it’s unreadable.
For genuinely high volumes, a simple cardboard or acrylic jig positions every envelope identically, cutting out the small alignment errors that creep in after the fiftieth envelope. Keep a spare pad and a spare tin of the correct ink within reach, and if you use more than one stamp, rotate them so wear spreads evenly rather than wearing out your best plate first.
Pro Tip: If your team shares one stamp across several people, mark a small dot on the desk or jig where the corner of the envelope should sit. It sounds basic, but it removes almost all of the guesswork that causes crooked impressions.
How do you keep a stamp performing well over time?
A stamp that starts crisp won’t stay that way without basic upkeep.
- Re-ink before the pad runs dry, not after. Waiting until impressions look patchy stresses the mechanism and wastes envelopes on faint prints.
- Clean the rubber die gently, using only the cleaning solution your manufacturer recommends. Household cleaners can degrade the rubber.
- Store away from heat and direct sunlight. Warmth softens rubber and dries out ink faster than normal use.
- Store face-down where the manufacturer suggests, to protect the die from dust and knocks.
- Watch for faded edges, patchy inking, or physical damage to the die. These are signs to order a replacement plate rather than keep pressing on worn artwork that will only look worse with every use.
Getting the details right on real mail stock
Steven has written several of Stamp Design 4U’s guides on choosing and using rubber stamps for business, and the most common error he sees is ordering a beautiful design that was never tested on the actual paper it needed to work on. Screen previews lie. A proof stamped on your real envelope or parcel stock catches ink bleed, cramped lines, and layout problems that no digital mock-up will ever show you.
— Steven
Where to buy the right stamp for your business mail
There are practical options for mailing stamps built specifically for this job rather than adapted from a generic office stamp catalogue: proofs before production, and plates sized specifically for envelopes and parcels rather than desk paperwork. If you’ve settled on the self-inking address stamp recommended earlier, browse the address stamps collection for ready sizes, or look at the 60 x 40mm logo and text stamp if you need a combined name, address, and logo design.
Stamping kraft boxes or padded mailers regularly? The personalised packaging stamps range is built for those tougher, more fibrous surfaces. Running low on ink or need a fresh pad for an existing stamp? Check the stamp pads selection before your current one dries out mid-run.
Whichever plate you’re eyeing, order a proof or a small first batch rather than committing straight to hundreds of units. It costs little and it’s the surest way to catch a layout problem before it’s stamped on your entire month’s post. Browse the full stamps for small business range to compare formats side by side and place your order when you’re happy with the design.
Sources
For size charts and design detail beyond this guide, see the company stamp guide, the stamp size guide, and Stamp Design 4U’s own rubber stamp buying advice. Always test proofs on your own paper stock first.
- How to Choose a Company Stamp: UK Business Guide
- Custom address stamps — how to get the right design, size, and ink for everyday use - Glossy Magazine
- How to stamp a document: A step-by-step guide for physical & digital files
FAQ
What’s the best stamp type for everyday business mail?
A self-inking rectangular stamp suits most outgoing post because it’s fast, refillable, and gives consistent impressions across high volumes.
Should I put my phone number on a mail stamp?
Only if it fits without crowding the design; the business name and return address should always take priority over extra contact details.
What ink should I use for kraft parcels?
Pigment or oil-based inks resist smudging and bleed on kraft and other rough or porous surfaces far better than dye-based inks.
How big should an address stamp be?
Rectangular plates around 60 x 40mm suit most multi-line addresses and logos, while smaller round stamps of 20 to 40mm work for initials, seals, or loyalty marks.
How do I stop my stamp impressions from fading?
Re-ink the pad as soon as coverage starts to look patchy, clean the die with a manufacturer-recommended solution, and store the stamp away from heat and sunlight.